Cute nail art is where creativity meets personality in the smallest, most delightful canvas. Unlike dramatic or high-fashion manicures, cute nail designs focus on charm, playfulness, and expressive details that instantly lift your mood. They’re fun to look at, fun to wear, and often surprisingly simple to recreate. Cute nails don’t need to be complicated — they rely on color, tiny illustrations, soft palettes, and cheerful themes that feel lighthearted and approachable.

One reason cute nail art remains so popular is emotional impact. Small visual details — hearts, flowers, smiley faces, pastel clouds — trigger joy. Pinterest trends consistently show that people save nail art that feels comforting, nostalgic, or whimsical. Cute nails often borrow from childhood imagery, cartoons, soft candy colors, and doodle-style art. They feel personal rather than polished, playful rather than perfect.
Another advantage is accessibility. Many cute designs are beginner-friendly and don’t require professional tools. Dotting tools, stickers, nail stamps, and simple brushes can create impressive results. Even short natural nails can carry adorable designs — you don’t need long acrylics to join the trend. Cute nail art adapts to all shapes and lengths.
Color plays a huge role. Pastels, soft pinks, baby blues, mint greens, and lilac shades dominate cute nail aesthetics. These colors feel gentle and friendly. Patterns are usually small-scale so the nails don’t look busy. Negative space, soft gradients, and micro-illustrations keep designs balanced.
This guide explores 20 cute nail art ideas that blend simplicity with personality. Each idea includes a clear concept, easy steps, and materials so you can recreate them at home or show your nail tech exactly what you want. Think of these designs as tiny mood boosters — wearable happiness at your fingertips.
1. Pastel Heart Accent Nails
Tiny pastel hearts scattered over a soft base create a sweet, romantic manicure. This design feels gentle and playful without being overly busy. The hearts can be evenly spaced or randomly placed for a doodled effect.
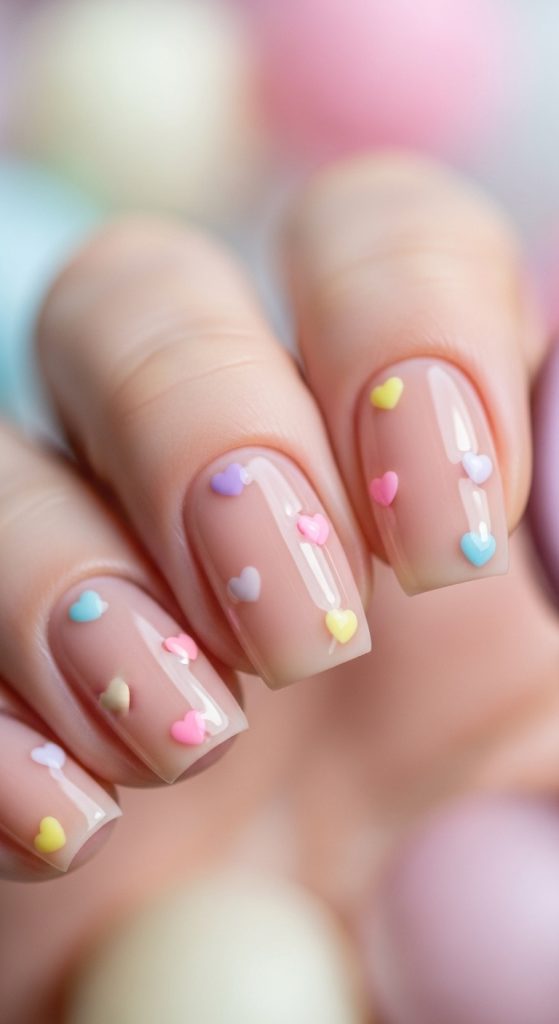
Pastel tones keep the look soft and dreamy, perfect for everyday wear.
How to Create It Step by Step
Paint nails with a pastel base color. Let dry completely. Use a dotting tool to create small hearts in contrasting pastel shades. Seal with glossy top coat.
Materials Needed
- Pastel nail polish
- Dotting tool
- Fine brush
- Top coat
2. Smiley Face Cute Nails
Smiley faces add instant cheer. A tiny yellow smile on neutral nails creates playful nostalgia. This design feels youthful and fun.

How to Create It Step by Step
Apply nude or clear base. Paint small yellow circles. Add black dots for eyes and curved smile lines.
Materials Needed
- Nude polish
- Yellow polish
- Black nail art pen
3. Strawberry Milk Nails
Soft pink base with tiny strawberry illustrations creates a kawaii-inspired manicure. The tiny fruit details add adorable charm.

How to Create It Step by Step
Paint nails milky pink. Use red polish to dot strawberries. Add green tops with detail brush.
Materials Needed
- Milky pink polish
- Red polish
- Green polish
- Detail brush
4. Cloudy Sky Nails
Soft blue nails with fluffy white clouds feel dreamy and calm. This design looks like a tiny sky on your fingertips.
How to Create It Step by Step

Paint nails baby blue. Dab white polish with sponge to create cloud shapes.
Materials Needed
- Blue polish
- White polish
- Makeup sponge
5. Mini Daisy Flower Nails

Tiny daisies create cheerful spring energy. They’re simple but adorable.
How to Create It Step by Step
Paint pastel base. Use dotting tool to create flower petals and yellow centers.
Materials Needed
- Pastel polish
- White polish
- Yellow polish
- Dotting tool
6. Candy Sprinkle Nails
Colorful micro dots resemble candy sprinkles. This manicure feels playful and sweet.

How to Create It Step by Step
Apply clear or nude base. Add tiny colored dots randomly.
Materials Needed
- Clear polish
- Multiple bright colors
- Dotting tool
7. Cute Cartoon Star Nails
Tiny stars add magical charm. This design feels whimsical and light.

How to Create It Step by Step
Paint neutral base. Draw small stars with nail pen.
Materials Needed
- Neutral polish
- Nail art pen
8. Pink French Tip Cute Nails
Classic French tips in baby pink soften the look and feel sweet.
How to Create It Step by Step
Create thin pink French tips. Add tiny heart accent on one nail.

Materials Needed
- Pink polish
- French guides
9. Polka Dot Cute Nails
Tiny dots create retro charm and visual texture.
How to Create It Step by Step
Paint base color. Add evenly spaced dots.

Materials Needed
- Base polish
- Dotting tool
10. Rainbow Pastel Nails
Each nail painted a different pastel shade creates joyful variety.

How to Create It Step by Step
Paint each nail a different pastel color. Add glossy top coat.
Materials Needed
- Pastel polish set
- Top coat
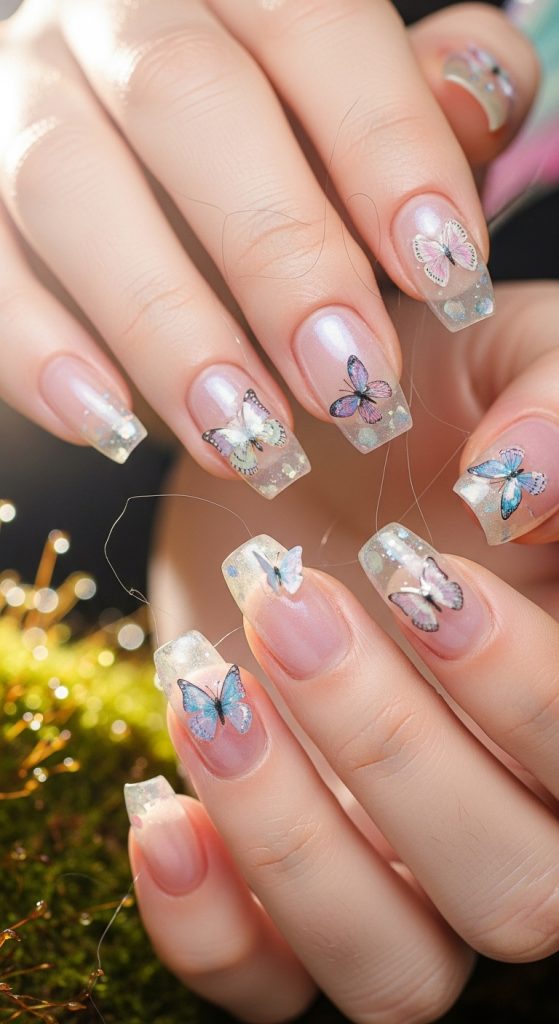
11. Tiny Butterfly Cute Nails
Mini butterflies give a soft fairy-core aesthetic that feels delicate and magical. This design looks intricate but can be simplified into tiny wing shapes or decals. Butterflies add movement and whimsy without crowding the nail.

How to Create It Step by Step
Apply a sheer or pastel base. Use butterfly nail stickers or draw tiny wings with a fine brush. Place one butterfly per accent nail for balance. Seal with glossy top coat.
Materials Needed
- Sheer or pastel polish
- Butterfly stickers or decals
- Fine nail brush
- Top coat
12. Kawaii Face Nails
Tiny cartoon faces create playful personality. Each nail can have a slightly different expression, making the manicure feel animated and fun.

How to Create It Step by Step
Paint nails pastel or nude. Use a nail art pen to add dot eyes and tiny smiles. Keep expressions simple to avoid clutter.
Materials Needed
- Pastel polish
- Black nail art pen
- Dotting tool
13. Jelly Glitter Cute Nails
Sheer jelly polish with fine glitter creates a soft candy-like sparkle. The translucent finish feels youthful and glossy.
How to Create It Step by Step
Apply jelly polish in 2 thin coats. Add a glitter topper while still tacky. Seal with high-shine top coat.
Materials Needed
- Jelly nail polish
- Fine glitter topper
- Glossy top coat
14. Mini Cherry Nails
Tiny cherries add vintage sweetness and retro charm. Red dots with green stems instantly read cute and nostalgic.

How to Create It Step by Step
Paint nails soft nude or pink. Add two red dots close together. Draw thin green stems connecting them.
Materials Needed
- Nude or pink polish
- Red polish
- Green polish
- Detail brush
15. Soft Gradient Cute Nails
A pastel gradient fade creates dreamy softness. The smooth transition feels airy and gentle.

How to Create It Step by Step
Apply two pastel shades onto a sponge. Dab gently onto nails to blend. Clean edges and seal.
Materials Needed
- Two pastel polishes
- Makeup sponge
- Top coat
16. Cute Animal Accent Nails
Tiny animal faces — bears, cats, or bunnies — add adorable character. Accent nails keep the design balanced.

How to Create It Step by Step
Paint neutral base. Draw simple animal faces using dots and small lines. Keep shapes rounded and minimal.
Materials Needed
- Neutral polish
- Nail art pen
- Dotting tool
17. Bubble Dot Cute Nails
Raised gel dots create a 3D bubble effect that looks playful and tactile.
How to Create It Step by Step
Apply base color. Use thick gel to create raised dots. Cure under lamp. Seal lightly.
Materials Needed
- Gel polish
- Builder gel
- Dotting tool
- UV lamp
18. Cute Bow Ribbon Nails
Tiny bows add gift-like charm. This design feels feminine and decorative.

How to Create It Step by Step
Paint pastel base. Draw small bow shapes or apply bow decals. Add gloss for shine.
Materials Needed
- Pastel polish
- Bow stickers or brush
- Top coat
19. Milk Bath Cute Nails
Sheer milky nails with embedded tiny flowers create a soft floating effect. This style feels dreamy and delicate.

How to Create It Step by Step
Apply milky gel layer. Place tiny dried flowers or decals. Seal with clear gel.
Materials Needed
- Milky gel polish
- Tiny flower decals
- UV lamp
20. Cute Starry Night Nails
Tiny pastel stars scattered over dark or pastel base create a magical night-sky vibe.
How to Create It Step by Step
Paint base color. Add micro stars with nail pen or stickers. Keep spacing airy.
Materials Needed
- Base polish
- Star stickers or pen
- Top coat
