Introduction
Bathroom wall styling plays a key role in transforming a functional space into a visually organized and aesthetically balanced environment. Walls often remain underutilized, yet they offer significant potential for creative ideas that enhance both storage and decoration. Pinterest ideas frequently highlight bathroom wall styling because it combines DIY creativity with practical solutions that improve organization and design. This article explains how to style bathroom walls using structured, step by step methods that focus on functionality, durability, and visual appeal. Readers will learn how to select suitable materials, plan layouts, and apply styling techniques that align with modern design trends. Each idea presents a distinct approach that enhances the overall aesthetic while maintaining usability. These concepts are beginner friendly and adaptable to different bathroom sizes and layouts. With proper planning and execution, bathroom wall styling can improve organization, maximize space, and create a clean and cohesive home decor environment.
Why This Idea Is Trending or Useful
Bathroom wall styling ideas are trending because they provide an efficient way to improve both storage and visual appeal without requiring major renovations. Many modern design trends emphasize maximizing vertical space, especially in smaller bathrooms where floor area is limited. Pinterest inspiration often showcases these ideas due to their practical value and accessibility. Wall styling helps maintain organization by keeping essential items within reach while reducing clutter on surfaces. The DIY appeal lies in the ability to create customized solutions using simple materials and tools. This makes the project suitable for beginners who want to enhance their space without complex construction. The design relevance comes from its alignment with minimalist style principles that prioritize clean lines and functional layouts. These styling ideas also allow for personalization, enabling users to incorporate decorative elements while maintaining structure. This combination of practicality and aesthetic improvement contributes to the growing popularity of bathroom wall styling.
Materials and Preparation
Preparing for bathroom wall styling requires careful planning and selection of appropriate materials. Essential materials include wall shelves, hooks, adhesive mounts, storage baskets, mirrors, and decorative elements. Tools such as drills, measuring tools, and levelers may be required for installation. Preparation begins with assessing the available wall space and identifying areas that can support storage or decoration. Cleaning the walls ensures proper adhesion or secure mounting. Planning involves deciding the layout, including the placement of shelves, hooks, and decorative features. It is important to consider moisture resistance when selecting materials, as bathrooms require durable and water-resistant solutions. Proper measurement ensures that all elements are aligned and balanced. This step by step preparation helps create a structured and efficient design. A well-planned approach improves both functionality and aesthetic, ensuring that the bathroom wall styling remains practical and visually appealing over time.
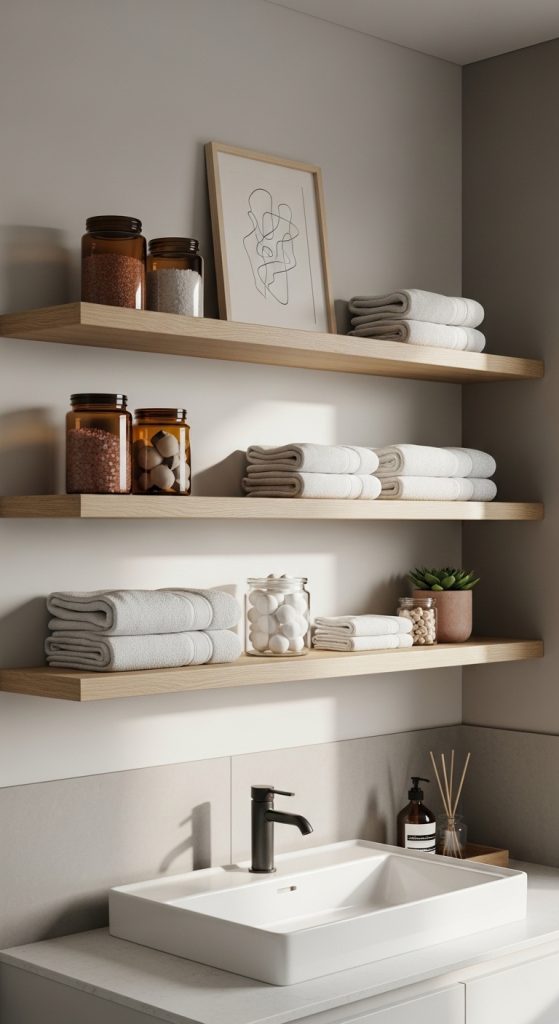
Idea 1: Floating Shelf Organization Wall
How to Create
Floating shelf organization walls provide a clean and structured way to store bathroom essentials while enhancing visual appeal. This design uses wall-mounted shelves to keep items such as towels, toiletries, and decorative elements organized and accessible. The floating design creates a minimalist style by eliminating visible supports, resulting in a clean and modern look. This approach aligns with Pinterest ideas that emphasize both functionality and aesthetic balance. It is particularly useful in small bathrooms where maximizing vertical space is essential. The shelves can be arranged in symmetrical or staggered patterns to create visual interest while maintaining organization.
To create this setup, measure the wall area and mark positions for the shelves using a level to ensure alignment. Install the shelves securely using appropriate mounting tools. Arrange items evenly, grouping similar materials together for a cohesive look. Use containers or baskets to maintain order and prevent clutter. This step by step method ensures stability and organization. Regular maintenance involves cleaning and adjusting items to maintain balance. This approach provides a practical and visually appealing solution for bathroom wall styling.
Idea 2: Wall-Mounted Storage Basket System
How to Create
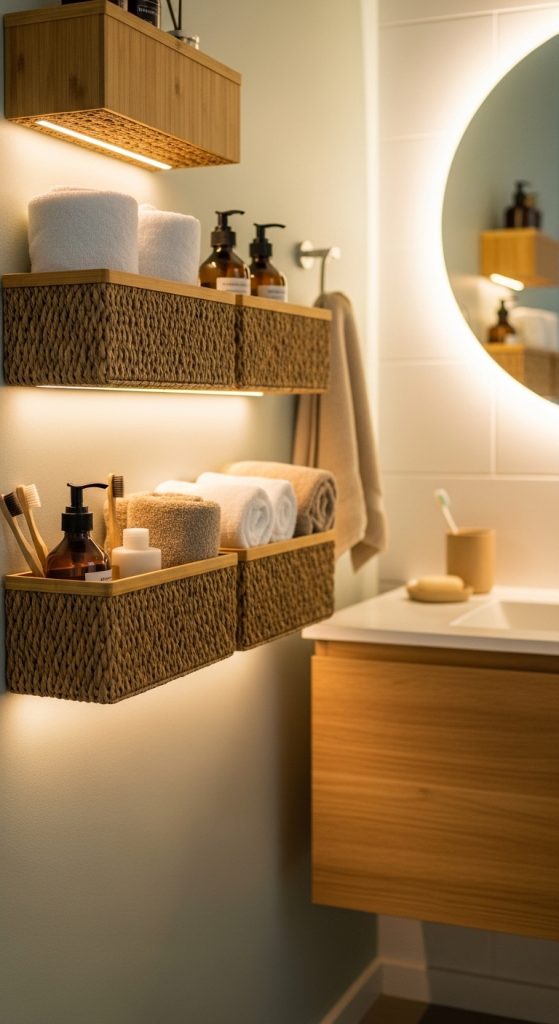
Wall-mounted storage baskets offer a flexible and accessible solution for organizing bathroom items. This design uses baskets attached to the wall to store items such as towels, toiletries, and cleaning supplies. The open structure allows easy access while maintaining organization. This idea aligns with modern design trends that prioritize functional storage solutions.
To implement this system, select durable and moisture-resistant baskets. Install mounting brackets or hooks securely on the wall. Attach the baskets evenly, ensuring proper spacing for accessibility. Arrange items logically, grouping similar materials together. This step by step process ensures efficient organization. Regular adjustments help maintain order and usability. This setup provides a practical and adaptable storage solution.
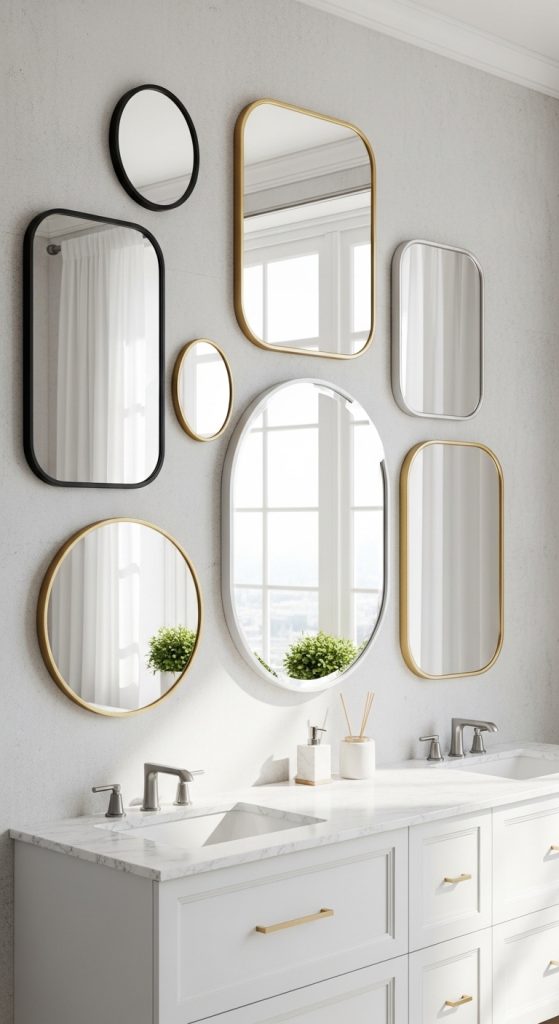
Idea 3: Decorative Mirror Feature Wall
How to Create
A decorative mirror feature wall enhances both functionality and visual depth in a bathroom. Mirrors reflect light, making the space appear larger and brighter. This design incorporates one or more mirrors arranged in a structured layout. It aligns with aesthetic trends that emphasize brightness and openness.
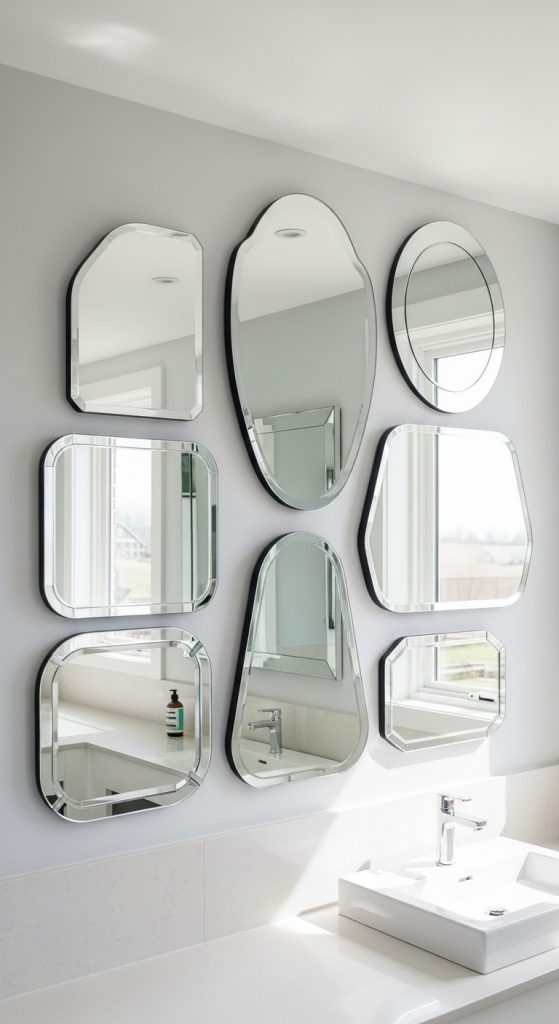
To create this feature, select mirrors that match the overall design theme. Measure and mark placement points to ensure alignment. Install the mirrors securely using appropriate mounting tools. Arrange them in a balanced pattern for visual consistency. This step by step method ensures a cohesive result. Regular cleaning maintains clarity and appearance. This approach enhances both function and aesthetic.
Idea 4: Vertical Towel Rack Display
How to Create
A vertical towel rack display uses wall space efficiently to store and present towels. This design keeps towels organized while adding a decorative element. It is particularly useful in compact bathrooms where space is limited.
To set up this feature, install a vertical rack or series of hooks on the wall. Arrange towels neatly, either folded or rolled, to create a structured appearance. Ensure that the rack is securely mounted to support weight. This step by step process ensures stability and organization. This approach provides both functionality and aesthetic appeal.
Idea 5: Minimalist Hook Wall
How to Create
A minimalist hook wall focuses on simplicity and functionality. Hooks are installed on the wall to hold items such as towels, robes, or accessories. This design aligns with minimalist style principles and maintains a clean appearance.
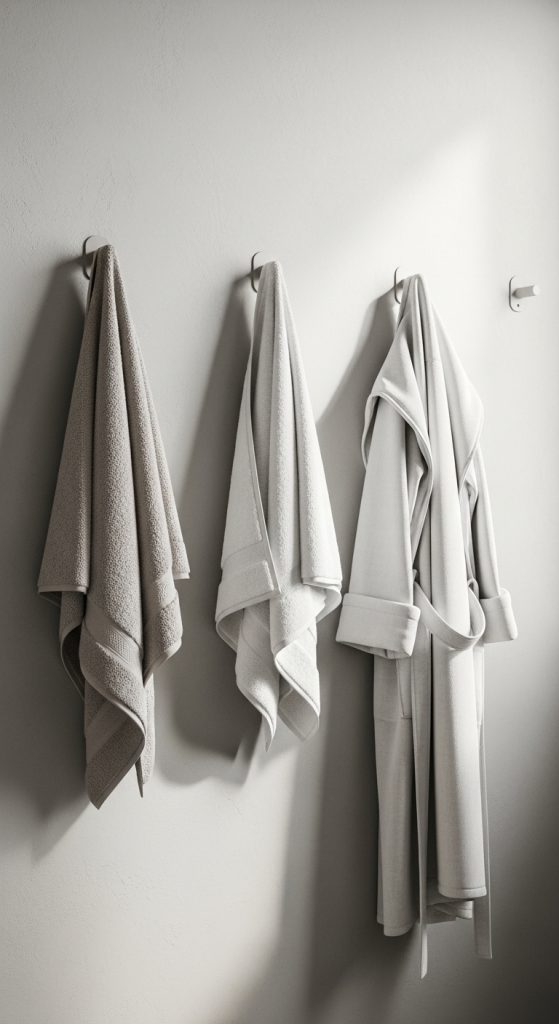
To create this setup, install hooks evenly along the wall. Ensure proper spacing for accessibility. Use durable materials suitable for bathroom conditions. This step by step method ensures a clean and organized result. This approach provides a simple and effective storage solution.
Idea 6: Wall Art and Frame Styling
How to Create
Wall art and frame styling adds personality and visual interest to a bathroom. This design incorporates framed artwork or prints that complement the overall decor. It enhances the aesthetic without affecting functionality.
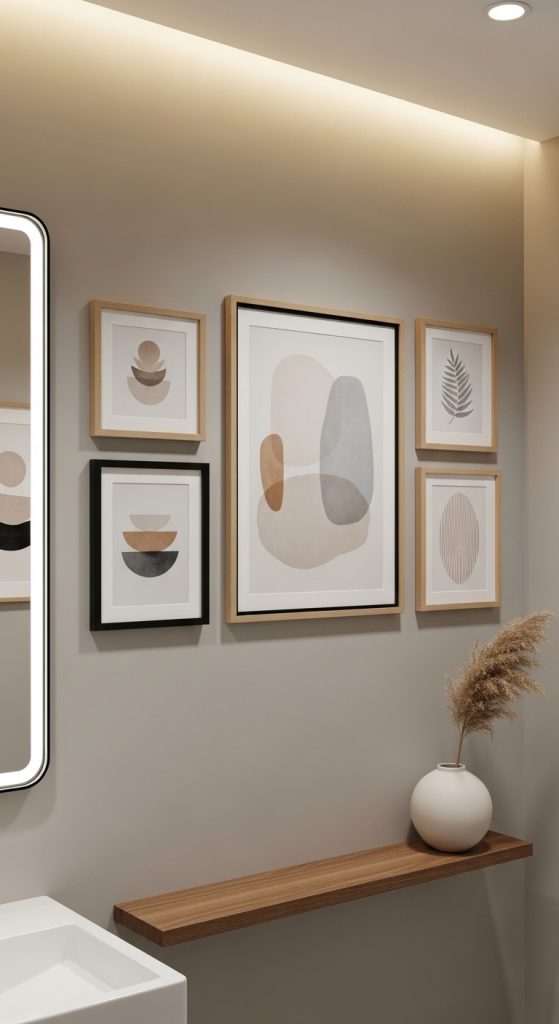
To implement this idea, select moisture-resistant frames and artwork. Arrange them in a balanced layout on the wall. Secure them properly to prevent movement. This step by step process ensures a cohesive and stable display. This approach creates a personalized and visually appealing environment.
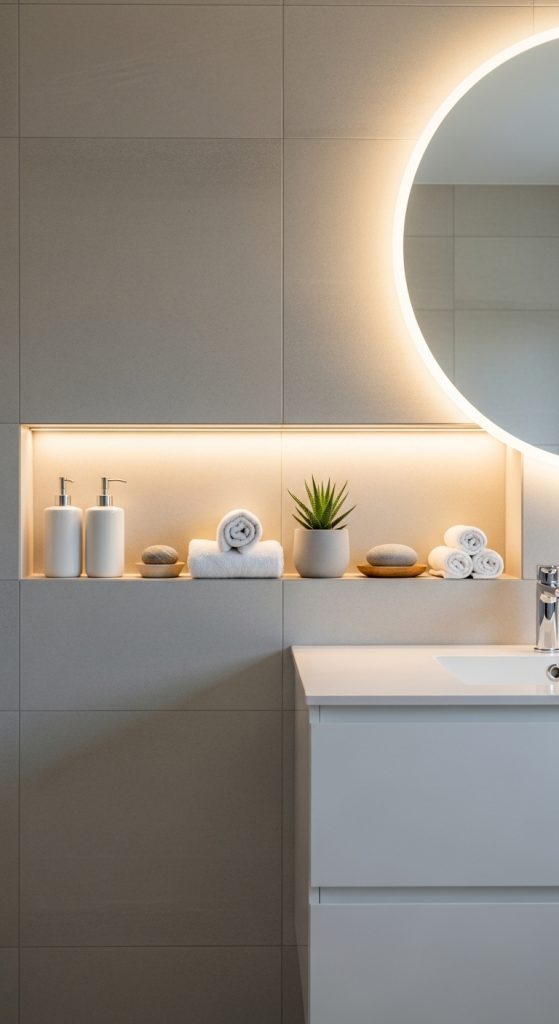
Idea 7: Built-In Wall Niches
How to Create
Built-in wall niches provide recessed storage within the wall itself. This design creates a clean and integrated look while maximizing space. It is particularly useful for storing toiletries in showers or near sinks.
To create this feature, plan the location and dimensions of the niche. Cut and frame the area carefully, ensuring structural integrity. Install waterproof materials to protect against moisture. This step by step process ensures durability and functionality. This approach provides a seamless storage solution.
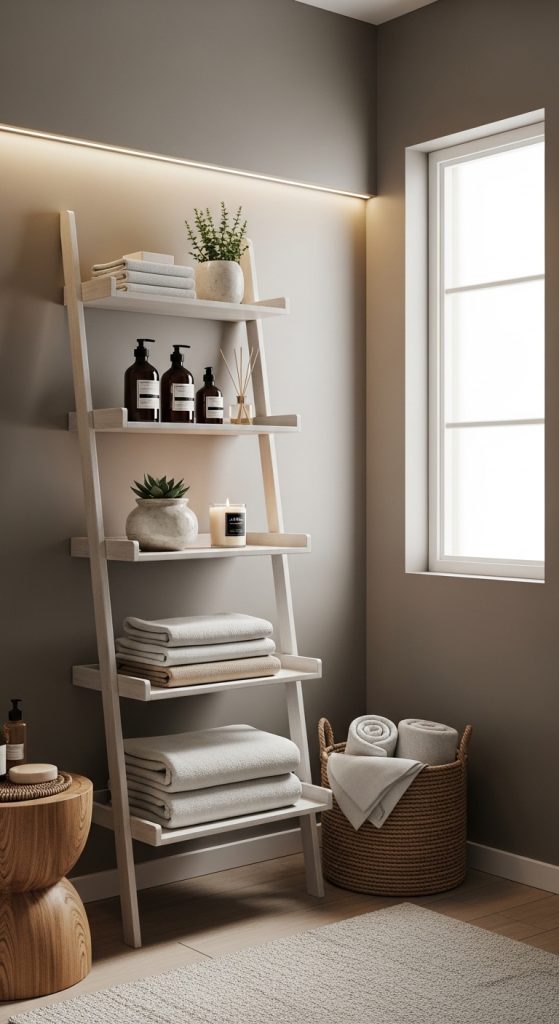
Idea 8: Ladder Shelf Wall Styling
How to Create
A ladder shelf leaning against the wall offers both storage and decorative display. This design combines functionality with a modern aesthetic. It allows for flexible arrangement of items.
To set up this feature, position a ladder shelf securely against the wall. Arrange items on each level, balancing storage and decoration. Ensure stability to prevent movement. This step by step method ensures safety and organization. This approach creates a stylish and practical solution.
Idea 9: Hanging Plant Wall Accent
How to Create
A hanging plant wall accent introduces natural elements into the bathroom. This design enhances the aesthetic while improving the environment. Plants add color and texture to the space.
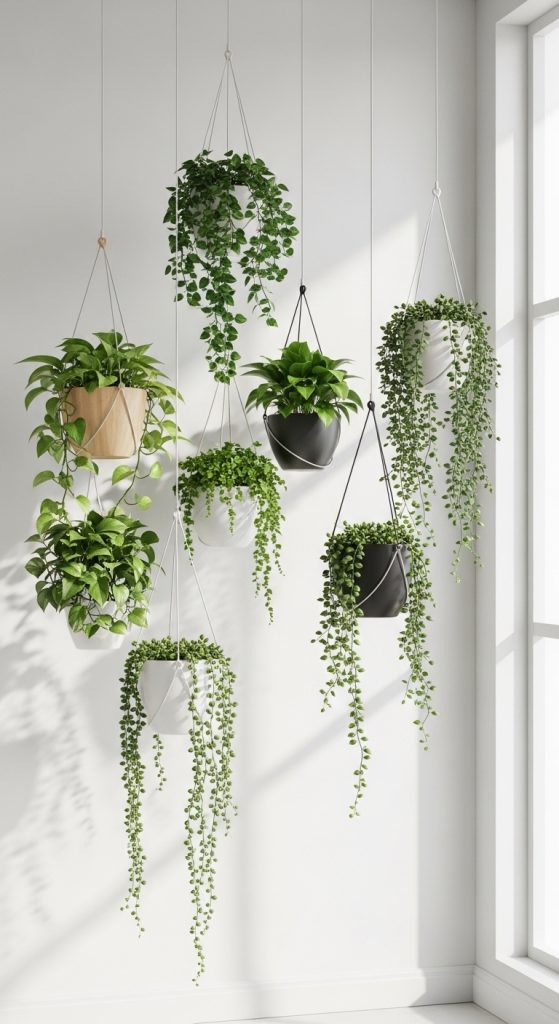
To create this feature, install hooks or brackets for hanging planters. Choose plants suitable for bathroom conditions. Arrange them evenly for a balanced look. This step by step process ensures stability and visual appeal. This approach adds freshness and life to the bathroom.
Idea 10: Multi-Functional Wall Organizer
How to Create
A multi-functional wall organizer combines storage and display elements into one system. This design maximizes efficiency by integrating shelves, hooks, and compartments. It supports organization and accessibility.
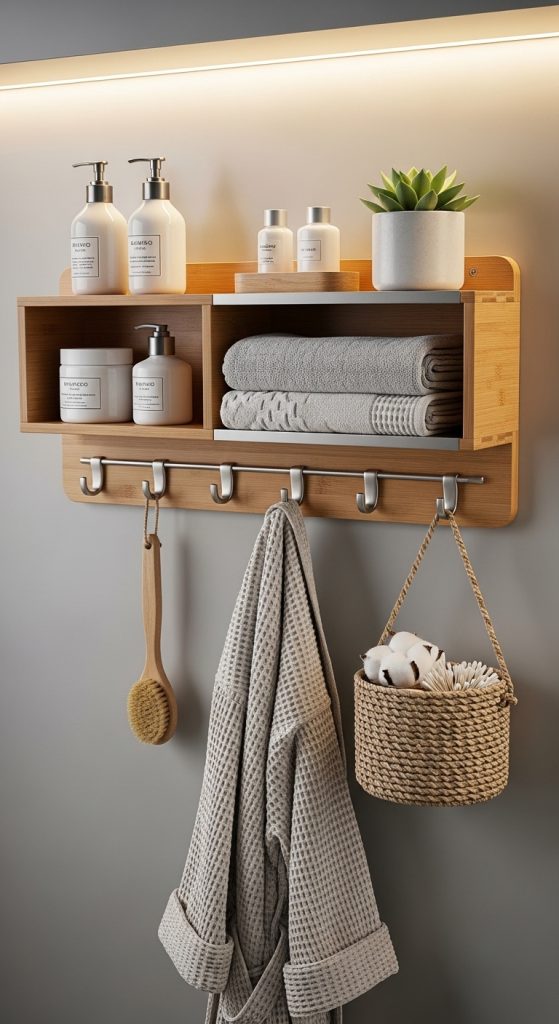
To implement this setup, install a wall organizer unit securely. Arrange items logically within the compartments. Ensure proper spacing for ease of use. This step by step method ensures functionality and balance. This approach provides a comprehensive storage solution.
Common Beginner Mistakes and How to Avoid Them
A common mistake is overcrowding the wall with too many elements, which reduces both functionality and visual clarity. Another issue is improper measurement, leading to misaligned installations. Using materials that are not moisture-resistant can also cause damage over time. To avoid these problems, focus on planning and selecting durable materials. Measure carefully and maintain balanced spacing. A structured approach ensures a clean and organized result.
Practical Tips for Better Results
Use consistent spacing and alignment for all wall elements. Choose materials that are durable and suitable for bathroom conditions. Maintain regular cleaning and organization to preserve the appearance. These tips improve both functionality and aesthetic quality.
Styling, Presentation, or Organization Ideas
Combine storage and decorative elements to create a balanced design. Use neutral tones for a cohesive look. Arrange items symmetrically to maintain structure. This approach enhances both organization and visual appeal.
Budget or Time Planning
Start with essential elements such as shelves and hooks before adding decorative features. Use affordable materials to manage costs. Plan the installation process step by step to save time. This approach ensures efficient completion.
Creative Expansion and Advanced Inspiration
Advanced ideas include combining multiple wall features or integrating lighting elements. Experimenting with layouts allows for customization. These creative ideas support continuous improvement and adaptability.