
Quick nail art ideas have become one of the most searched and saved beauty trends on Pinterest — and the reason is simple: people want beautiful nails without spending hours creating complicated designs. In today’s fast-paced lifestyle, not everyone has the time for intricate nail art or frequent salon visits. That’s where quick nail art comes in — stylish, creative, and achievable designs that look impressive while requiring minimal effort and time.
The beauty of quick nail art lies in its accessibility. You don’t need professional tools, advanced techniques, or years of practice to create something aesthetic and Pinterest-worthy. Many quick designs rely on simple tricks like dots, stripes, gradients, or minimal accents that instantly elevate plain nail polish into something eye-catching. These small details make a huge difference, transforming an ordinary manicure into a stylish statement.
Another reason quick nail art performs so well on Pinterest is its versatility. Whether you love minimal, elegant styles or playful and colorful designs, there’s always a quick technique that fits your personality. These designs are perfect for students, busy professionals, beginners, or anyone who wants their nails to look polished without dedicating an entire afternoon to the process. They are also ideal for last-minute events when you need your nails to look fresh and stylish quickly.
Quick nail art is also incredibly beginner-friendly. Most designs can be done using everyday items like bobby pins, tape, or makeup sponges. This means you can experiment, practice, and develop confidence without worrying about perfection. In fact, many quick designs look better when they feel slightly natural and effortless — which is exactly the aesthetic Pinterest users love.
In this complete Pinterest-style guide, you’ll discover 10 deeply detailed quick nail art ideas that are practical, stylish, and easy to recreate. Each idea includes a full explanation, step-by-step How To instructions, and a clear Materials Used section so you can confidently try each look at home. Every design is balanced to be equally detailed, beginner-friendly, and save-worthy.
If you’re ready to upgrade your nails with fast yet beautiful ideas, let’s dive into the most inspiring quick nail art designs you’ll want to try immediately.
1. Minimal Dot Nail Art
Minimal dot nail art is one of the fastest and most beginner-friendly nail designs you can create. The concept is simple: small dots placed strategically on a solid nail color to create a clean, modern aesthetic. Despite how easy it is, dot nail art looks incredibly stylish and intentional, which is why it’s a frequent favorite on Pinterest boards.

The beauty of this design lies in its flexibility. You can keep it minimal with a single dot near the cuticle for an elegant look or create patterns like vertical lines, triangles, or scattered dots for a playful vibe. Because dots are small and controlled, mistakes are less noticeable, making this an ideal starting point for beginners.
Another reason this design is so popular is how quickly it dries. Unlike layered nail art, dots require minimal polish, reducing smudging and drying time. You can customize colors based on season or mood — neutral dots for everyday wear, bright tones for summer, or metallic shades for special occasions.
How To
Start by applying a base coat and your chosen base color. Allow the polish to dry completely before adding dots. Using a dotting tool, toothpick, or the rounded end of a bobby pin, dip lightly into a contrasting nail polish color. Gently press onto the nail to create dots.
Work slowly and plan placement before touching the nail. You can add one dot per nail for minimal style or multiple dots for patterns. Once satisfied, let the design dry for a minute before sealing with a top coat. The top coat smooths the dots and makes the design last longer.
Materials Used
- Base coat
- Nail polish (base color)
- Contrasting polish for dots
- Dotting tool, toothpick, or bobby pin
- Top coat
- Nail polish remover for cleanup
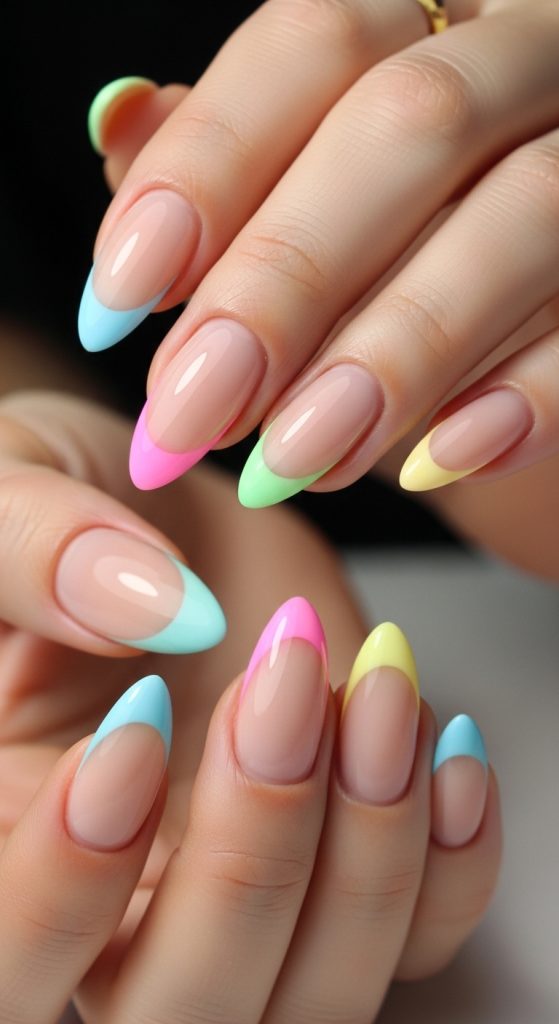
2. Quick French Tip Twist
The French tip is a timeless classic, but a quick modern twist makes it even more Pinterest-worthy. Instead of traditional white tips, you can use bold colors, glitter, or pastel shades for a fresh, trendy look. This design is quick because only the tips need detailing, making it less time-consuming than full nail art.
The modern French tip works well on any nail length and instantly gives nails a polished appearance. It’s perfect for those who want something elegant but slightly playful. Pinterest users love this design because it feels both classy and current.
How To
Apply a nude or light base color and allow it to dry fully. Use nail guides or steady freehand strokes to paint the tips with your chosen color. Keep the line thin and smooth for a clean look.
If you’re new to French tips, start with shorter strokes and build the shape gradually. Once the tips dry, apply a glossy top coat to blend the design and add shine. Clean edges carefully for a salon-like finish.
Materials Used
- Nude or neutral base polish
- Tip color polish
- Nail guides or tape (optional)
- Thin nail brush
- Top coat
3. Glitter Accent Nail
Glitter accent nails are the definition of quick glam. Instead of covering every nail with glitter, you simply choose one or two accent nails to sparkle while keeping the rest simple. This creates balance and makes the design look intentional rather than overwhelming.

This idea is extremely popular because it takes very little effort but looks instantly stylish. It’s perfect for parties, holidays, or anytime you want a little extra shine.
How To
Paint all nails with your chosen base color and let them dry. Select one or two nails as accent nails. Apply glitter polish or loose glitter onto these nails while the polish is slightly tacky.
Seal all nails with a thick top coat to smooth the glitter texture and ensure durability. Allow extra drying time since glitter layers can be thicker.
Materials Used
- Base color nail polish
- Glitter polish or loose glitter
- Base coat
- Top coat
- Small brush (if using loose glitter)
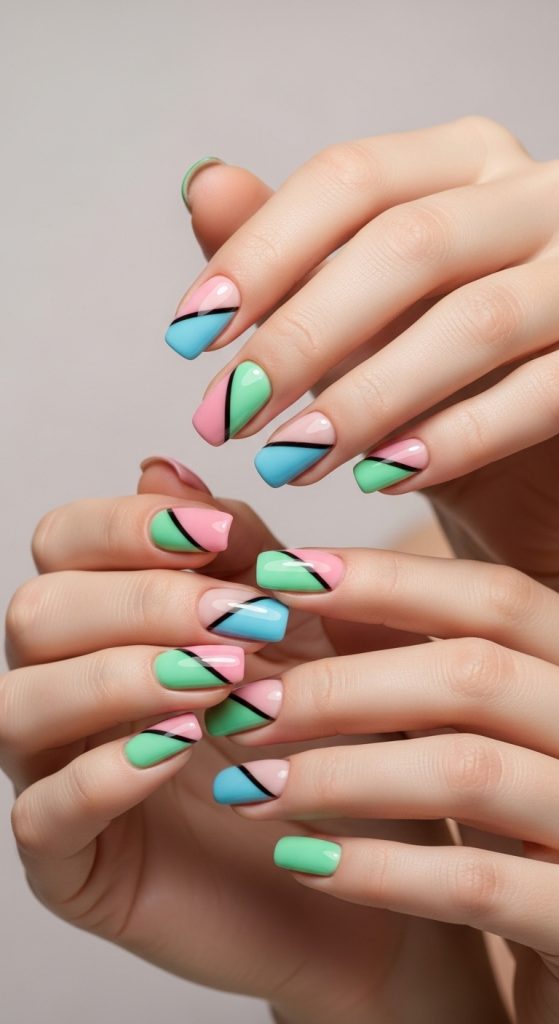
4. Diagonal Color Block Nails
Color block nails look artistic yet are surprisingly quick to create. Diagonal lines add a modern, geometric feel that’s highly Pinterest-friendly. The contrast between two colors makes nails look creative without requiring advanced skills.
How To
Apply the first base color and let it dry completely. Place tape diagonally across each nail to section it off. Paint the exposed area with a second color. Remove tape carefully while polish is still slightly wet for clean lines.
Finish with a top coat to seal and smooth the design.
Materials Used
- Two nail polish colors
- Striping tape or regular tape
- Base coat
- Top coat
5. Easy Ombre Sponge Nails
Ombre nails may look complex, but using a sponge makes them quick and beginner-friendly. The gradient effect creates depth and softness that looks professional.

How To
Apply a light base color. On a makeup sponge, paint two polish colors side by side. Dab gently onto the nail to blend. Repeat until the gradient appears smooth.
Clean excess polish around nails and apply a top coat to blend the colors seamlessly.
Materials Used
- Two nail polish colors
- Makeup sponge
- Base coat
- Top coat
- Nail polish remover
6. Metallic Stripe Nails
Metallic stripes instantly make nails look modern and stylish. This design is quick because it relies on simple straight lines rather than detailed art.

How To
Paint nails with a base color and let dry. Apply metallic striping tape across nails in straight lines. Press gently to secure. Seal with top coat to prevent lifting.
Materials Used
- Base color polish
- Metallic striping tape
- Base coat
- Top coat
7. Negative Space Nail Art
Negative space designs leave parts of the nail bare, creating a clean, minimalist aesthetic. This style is trendy and very quick because less painting is required.

How To
Apply tape shapes onto bare nails. Paint over with color and remove tape before polish fully dries. Seal with clear top coat for a sleek finish.
Materials Used
- Nail polish
- Tape or nail vinyls
- Base coat
- Top coat
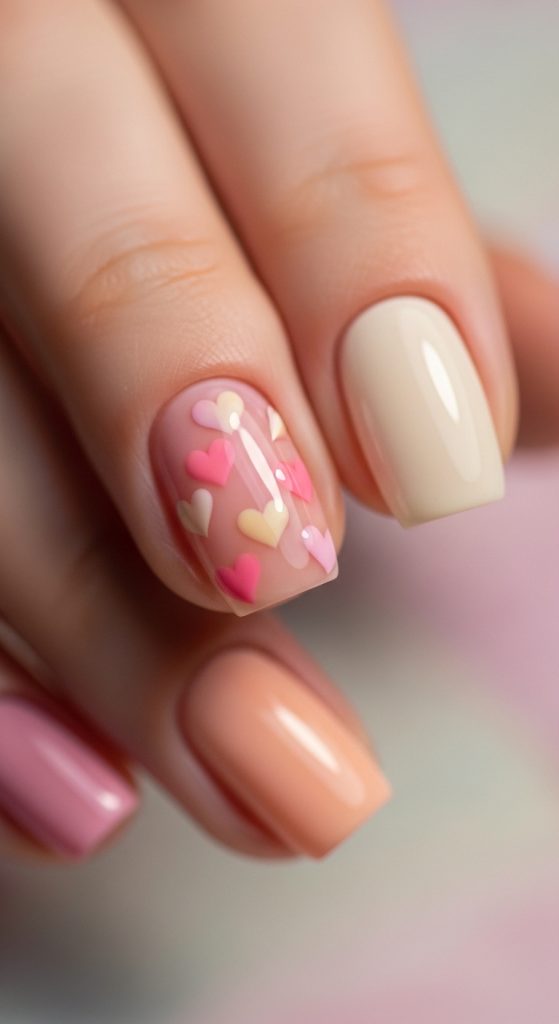
8. Heart Accent Nails
Small heart accents add a cute and playful touch without requiring much time. Perfect for romantic or soft aesthetic styles.
How To
Paint nails with base color. Use a dotting tool to place two small dots side by side, then drag downward to form a heart shape. Repeat on accent nails only. Seal with top coat.
Materials Used
- Base polish
- Accent color polish
- Dotting tool
- Top coat
9. Marble Effect Quick Nails
Marble nails look artistic but can be done quickly with simple swirling techniques. The random patterns mean perfection isn’t required.

How To
Apply base color. While slightly wet, add small lines of a second color and swirl gently using a toothpick. Seal with top coat once dry.
Materials Used
- Two nail polish colors
- Toothpick or thin brush
- Base coat
- Top coat
10. Confetti Nail Art
Confetti nails are fun, colorful, and perfect for quick creative expression. Small pieces of glitter or multi-color dots make nails look festive instantly.

How To
Paint nails with a neutral base. Apply confetti glitter randomly using a brush or toothpick. Keep placement balanced. Seal with top coat to smooth texture.
Materials Used
- Neutral base polish
- Confetti glitter polish
- Base coat
- Top coat