
Summer nail easy ideas focus on color, simplicity, and quick execution. During warmer months, nail designs shift toward lighter tones, playful details, and breathable finishes that complement seasonal outfits. Pinterest ideas for summer nails often highlight pastel shades, glossy finishes, fruit accents, minimal line art, and soft gradients. The goal is to achieve an aesthetic manicure without complicated techniques or excessive tools. Easy summer nail designs rely on controlled layering, steady brushwork, and simple color combinations. Bright natural lighting enhances lighter shades, making summer the ideal time to experiment with vibrant pigments. Short and medium nail lengths work best for practical daily wear. The designs in this guide emphasize clean application and beginner friendly techniques. Each idea provides step by step guidance to help achieve smooth polish layers and long-lasting results. With the right preparation and basic materials, summer nails can look professional without requiring advanced artistic skills. These creative ideas blend color balance, structure, and seasonal inspiration to create manicures that feel fresh, modern, and wearable.
Why Simple Summer Nail Designs Continue to Trend
Easy summer nail designs remain trending ideas because they combine practicality with visual impact. Social platforms frequently showcase minimalist style manicures that photograph clearly under natural light. Soft pinks, bright corals, sky blues, lemon yellows, and sheer nudes dominate summer boards. These shades reflect sunlight and create a cheerful aesthetic. Simplicity also reduces maintenance time. Many people prefer easy projects that can be completed at home without salon appointments. Short drying time, low product layering, and minimal tools make these designs accessible. Additionally, simple nail art grows out more gracefully than complex patterns. Subtle accents such as dots, stripes, or negative space reduce visible chipping. The popularity of DIY tutorials contributes to this trend. Clear instructions encourage experimentation without risk. Budget ideas also influence the demand for easy summer nails, as most designs require only two or three colors. This balance of affordability, creativity, and practicality keeps easy summer nails consistently relevant during warm seasons.
Essential Materials and Preparation for Long-Lasting Results
Proper nail preparation ensures that summer manicures remain smooth and chip resistant. Begin by removing any old polish completely. Shape nails using a fine-grit file, choosing oval, square, or almond shapes depending on preference. Gently push back cuticles and trim excess skin carefully. Lightly buff the nail surface to remove shine and improve polish adhesion. Clean nails with alcohol or nail cleanser to eliminate oils. Essential materials include base coat, colored nail polish, thin nail art brush or dotting tool, top coat, nail polish remover, cotton pads, and cuticle oil. Always apply a thin base coat to protect natural nails and improve longevity. Allow each polish layer to dry before applying the next to prevent smudging. Use thin, even strokes to maintain clarity in color. Finish with a glossy or matte top coat depending on the desired finish. Proper drying time is essential for durability. Structured preparation transforms an easy project into a long-lasting manicure with clean edges and balanced color distribution.
1. Pastel French Tip Refresh

Step-by-Step Guide to Soft Color Contrast
A pastel French tip updates the classic manicure with seasonal brightness. Begin by applying a clear or sheer pink base coat. Allow it to dry completely. Choose a pastel shade such as mint, lavender, or baby blue for the tips. Use a thin brush or French tip guide to paint a curved line along the nail edge. Keep the line thin for a minimalist style. Apply two light layers for opacity. Seal with glossy top coat. This design works well on short or medium nails. It offers color without overwhelming the nail bed. The pastel contrast reflects summer light and pairs easily with casual outfits. This beginner friendly look requires steady hand control but minimal tools. Maintaining clean edges ensures professional results.
2. Coral Glossy Minimal Nails
How to Create a Bright Single-Tone Look

Coral polish provides instant summer warmth. After applying base coat, add two thin coats of coral polish. Ensure each coat dries fully before layering. Use even strokes from cuticle to tip. Finish with a high-gloss top coat. Coral complements most skin tones and requires no additional design elements. This easy project focuses on color clarity and smooth application.
3. Lemon Yellow Accent Nail

Execution Process for Subtle Playfulness
Apply a neutral nude shade to all nails except one accent finger. On the accent nail, apply two coats of lemon yellow polish. For added detail, paint small white dots using a dotting tool. Seal with top coat. This simple contrast introduces playful energy without complexity.
4. Sky Blue Short Square Nails

Step-by-Step Application for Clean Summer Vibes
File nails into short square shape. Apply base coat followed by two thin coats of sky blue polish. Keep layers thin to avoid streaks. Finish with glossy top coat. This shade reflects clear summer skies and maintains simplicity.
5. Pink and Orange Ombre Blend

How to Blend for Smooth Gradient
Apply pink polish as base color. While still slightly tacky, use a small sponge to dab orange polish onto tips. Blend gently where colors meet. Repeat lightly for smooth gradient. Seal with glossy top coat.
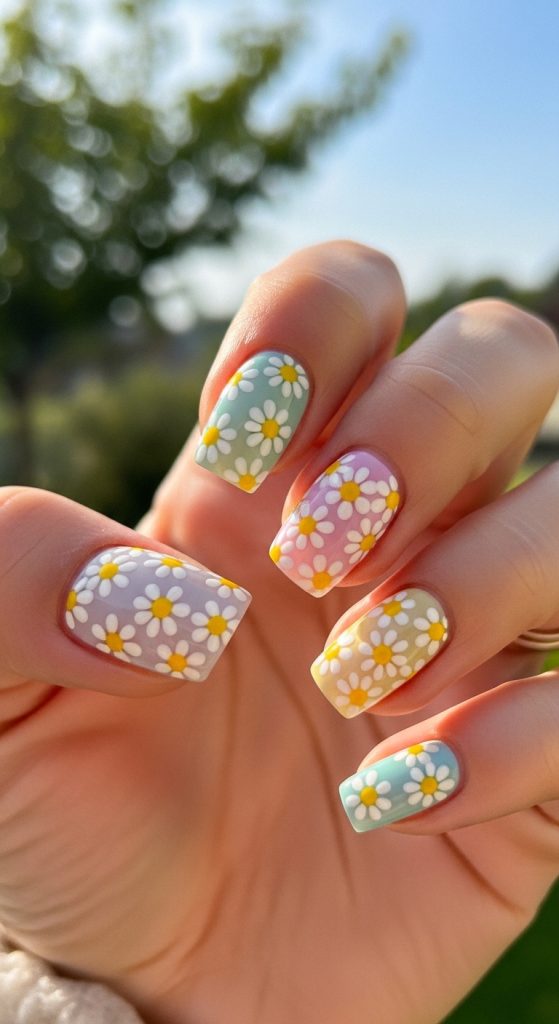
6. White Daisy Dot Design

Execution Strategy for Floral Detail
Paint nails with soft pastel base. Once dry, use dotting tool to create five white dots in circular pattern. Add small yellow dot in center. This easy floral pattern reflects seasonal inspiration.
7. Mint Green Matte Finish
Step-by-Step for Modern Texture

Apply mint green polish evenly. After drying, apply matte top coat for velvety finish. The matte texture contrasts glossy summer trends and adds modern design appeal.
8. Neon Pink Thin Stripe

How to Add Graphic Detail
Paint nails with neutral nude base. Once dry, use thin brush to draw vertical neon pink stripe down center. Keep line straight and balanced. Seal carefully.
9. Sheer Gloss with Gold Foil Accent
Execution Process for Subtle Shine
Apply sheer pink polish. Place small pieces of gold foil near cuticle while polish is slightly tacky. Press gently. Seal with top coat. This design offers minimal glam without heaviness.
10. Colorful Micro French Tips

Step-by-Step Multi-Color Detail
Apply clear base. Paint thin tips in different bright summer shades on each nail. Keep tips narrow for balance. Seal with glossy finish.
Common Beginner Mistakes and How to Avoid Them
Applying thick layers causes bubbles. Skipping base coat reduces durability. Not allowing drying time leads to smudges. Maintain thin, even coats and patience.
Practical Tips for Cleaner and Longer Wear
Use cuticle oil daily to maintain flexibility. Avoid hot water immediately after polishing. Apply top coat every few days to refresh shine.
Styling and Presentation for Seasonal Aesthetic
Coordinate nail colors with summer outfits. Keep jewelry minimal to highlight polish tones. Choose shapes that complement hand proportions.
Budget and Time Planning for DIY Summer Nails
Select versatile colors that work across designs. Allocate at least one hour for careful drying. Invest in quality base and top coats to reduce chipping.
Expanding Easy Summer Nail Creativity
Experiment with subtle glitter overlays. Combine pastel shades for geometric patterns. Introduce negative space for airy designs. Balanced experimentation keeps summer nails fresh, playful, and visually cohesive throughout the season.