Colourful polka dot nails are one of the most joyful and timeless nail trends because they combine simplicity with endless creativity. Polka dots instantly add personality, movement, and charm to any manicure. Unlike complicated nail art that requires advanced skills, polka dot designs are beginner-friendly while still looking playful and professional. This balance makes them extremely popular on Pinterest, where people search for nail ideas that are both aesthetic and achievable at home.

The beauty of colourful polka dot nails lies in flexibility. You can go bold with rainbow palettes or soft with pastel tones. You can create minimal dot accents or full graphic patterns. You can mix finishes — glossy, matte, glitter, or metallic — to add dimension. Every small change in color or spacing transforms the mood of the design. That’s why polka dot nails never go out of style: they adapt to seasons, outfits, and personalities.
Another reason polka dot nail art thrives is accessibility. You don’t need expensive salon tools. Most designs can be created using dotting tools, bobby pins, toothpicks, or small brushes. With the right technique and patience, even beginners can achieve crisp, clean dots. The process encourages experimentation and creativity rather than perfection. Slight imperfections often add handmade charm.
Polka dots also work across nail lengths and shapes. Short natural nails can carry playful micro-dots. Long acrylics can support layered graphic patterns. Square, almond, coffin, and round shapes all interpret dot art differently. This versatility allows everyone to personalize the style.
Color psychology plays a role too. Bright dots evoke happiness and energy. Pastels feel soft and romantic. Neon tones look bold and modern. Metallic dots add sophistication. A simple dotted manicure can reflect mood and personality without saying a word.
Pinterest trends show a rise in nail art that feels expressive but wearable. People want designs that look creative yet practical for daily life. Colourful polka dot nails meet that need perfectly. They’re eye-catching but not overwhelming, artistic but approachable.
This guide explores 20 colourful polka dot nail ideas designed for beginners and nail lovers alike. Each idea includes a clear explanation, step-by-step instructions, and material recommendations. These designs are meant to inspire creativity while staying achievable at home.
Whether you prefer soft pastels, bold neon, retro palettes, or minimalist accents, you’ll find a dotted design that matches your style.
Let’s begin.
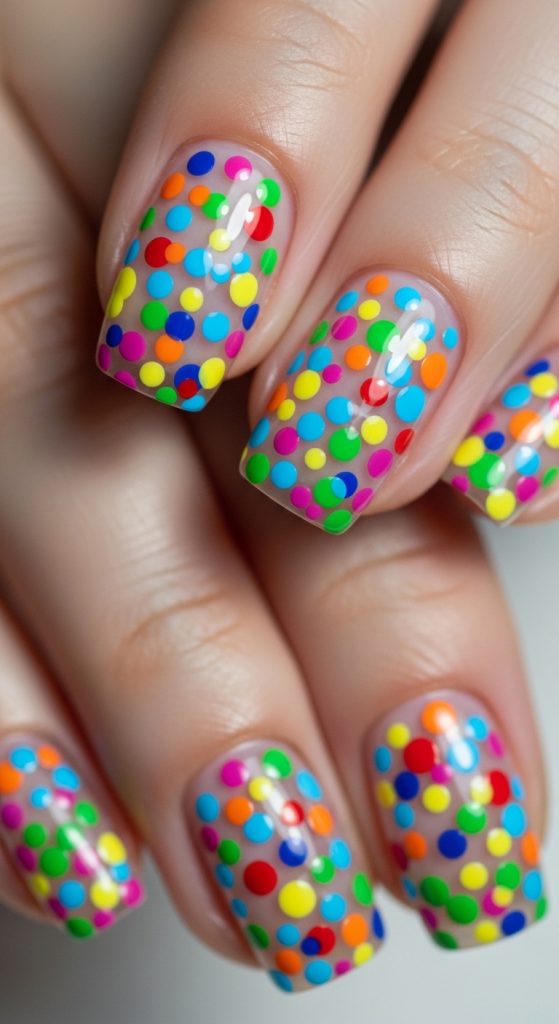
1. Rainbow Polka Dot Accent Nails
Rainbow dots bring instant joy to any manicure. Instead of covering every nail, this design focuses on accent nails to keep the look balanced. A neutral base allows the colors to pop without feeling chaotic.

This style is perfect for beginners because it’s forgiving and playful.
How to Create the Look
Paint nails with neutral base color. Using a dotting tool, place small rainbow dots randomly on accent nails. Seal with glossy top coat.
Materials Needed
- Neutral base polish
- Rainbow nail polish set
- Dotting tool or toothpick
- Top coat
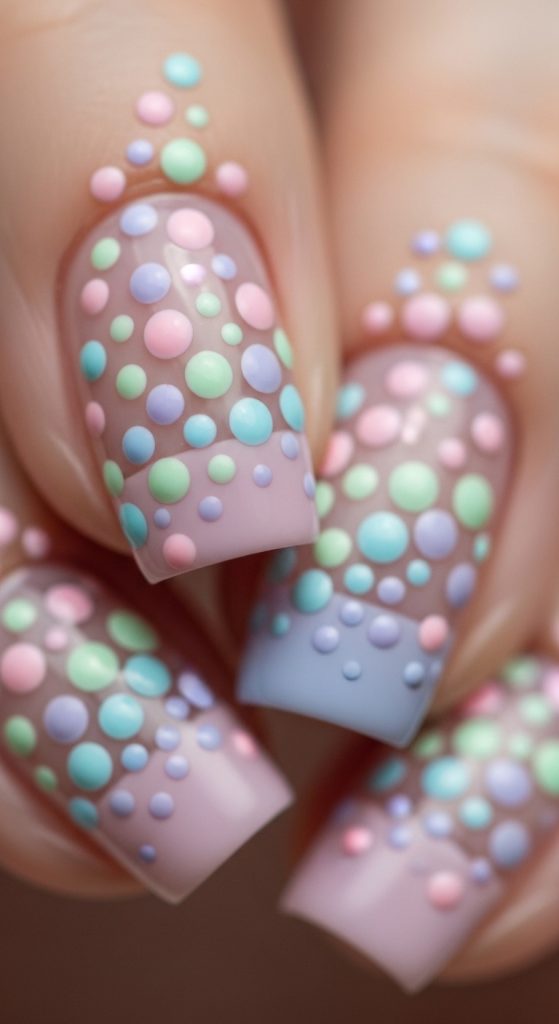
2. Pastel Polka Dot Soft Glam
Pastel dots create a delicate, romantic manicure. Soft pinks, blues, and lavenders feel gentle and feminine. This design suits spring aesthetics and minimal outfits.
The softness makes it wearable daily.
How to Create the Look

Apply pastel base. Add tiny white dots evenly across each nail. Finish with glossy or matte top coat.
Materials Needed
- Pastel polish
- White polish
- Dotting tool
- Top coat
3. Retro 70s Colour Pop Dots
This design uses bold retro colors like orange, mustard, and teal. It channels vintage energy and graphic style. Larger dots make the manicure statement-driven.

Perfect for bold personalities.
How to Create the Look
Paint a warm base. Add large contrasting dots spaced evenly. Repeat pattern consistently.
Materials Needed
- Retro color palette polish
- Dotting tool
- Base coat
- Top coat
4. Micro Dot Minimal Nails
Micro dots create a chic minimalist design. Tiny dots near the cuticle add interest without overwhelming the nail. It’s elegant and modern.
Ideal for professional settings.
How to Create the Look
Apply sheer or nude base. Place a single micro dot near each cuticle. Seal carefully.

Materials Needed
- Nude polish
- Fine dotting tool
- Top coat
5. Neon Pop Polka Dot Nails
Neon dots on a white base create a high-contrast summer look. The brightness feels energetic and youthful.

Great for vacations and festivals.
How to Create the Look
Paint nails white. Add neon dots randomly. Use glossy top coat for shine.
Materials Needed
- White polish
- Neon polish set
- Dotting tool
- Top coat
6. Matte Colour Block Polka Dots
Matte finishes instantly modernize polka dot nails. Instead of glossy shine, a matte top coat softens the colors and gives the manicure a velvety, editorial look. When combined with bold colour blocking, the dots become graphic design elements rather than playful accents. This style feels fashion-forward and clean.

Matte polka dots are ideal for people who want something trendy but not glittery. The lack of shine makes bright colors appear richer and more sophisticated. It works beautifully with contrasting tones like teal and coral, lilac and yellow, or pink and navy.
How to Create the Look
Apply a bold base color and let it dry completely. Add contrasting polka dots evenly across the nail. Seal with a matte top coat to transform the finish. Make sure each layer dries fully to avoid smudging.
Materials Needed
- Bold base polish
- Contrasting dot polish
- Dotting tool
- Matte top coat
7. Gradient Polka Dot Fade

This design uses dot size and spacing to create a gradient illusion. Dots start dense at one end and gradually fade into fewer dots toward the tip. The effect feels airy and artistic, like confetti dissolving into space.
It’s a creative twist that still stays beginner-friendly. You don’t need advanced blending skills — the gradient is created through placement, not color mixing.
How to Create the Look
Paint nails with a neutral or pastel base. Add many dots near the cuticle. Reduce the number of dots as you move upward. Keep dot size consistent for clean visual flow. Seal with gloss.
Materials Needed
- Neutral base polish
- Bright dot polish
- Dotting tool
- Top coat
8. Metallic Dot Accent Nails
Metallic dots elevate a simple manicure into something elegant. Gold, silver, or chrome dots catch the light beautifully and create jewelry-like detail on the nails. This design blends playful polka dots with sophistication.
Metallic accents are perfect for parties, weddings, or evenings out. They pair especially well with dark bases like black, burgundy, or navy.
How to Create the Look
Apply dark base color. Place small metallic dots strategically — either centered or along one side. Seal gently with top coat to preserve shine.
Materials Needed
- Dark polish
- Metallic nail polish
- Fine dotting tool
- Glossy top coat
9. French Tip Polka Dot Remix
This design reinvents the classic French manicure by replacing the tip line with colorful dots. It’s playful yet structured, combining tradition with creativity. The result feels polished but fun.
Great for people who like clean nail designs with a twist.
How to Create the Look
Paint nails nude or sheer pink. Instead of a white tip, add a row of evenly spaced colorful dots across the tip area. Keep spacing consistent for symmetry.
Materials Needed
- Nude base polish
- Colorful polish set
- Dotting tool
- Top coat
10. Confetti Party Polka Nails
Confetti nails embrace randomness. Different colors, dot sizes, and placements create a celebratory look. No two nails need to match perfectly. The charm comes from joyful chaos.

This style is perfect for birthdays, holidays, or festivals.
How to Create the Look
Apply clear or light base. Add dots in multiple sizes using several colors. Layer dots randomly. Seal with thick glossy top coat.
Materials Needed
- Clear or light base polish
- Multiple color polishes
- Various dotting tools
- Glossy top coat
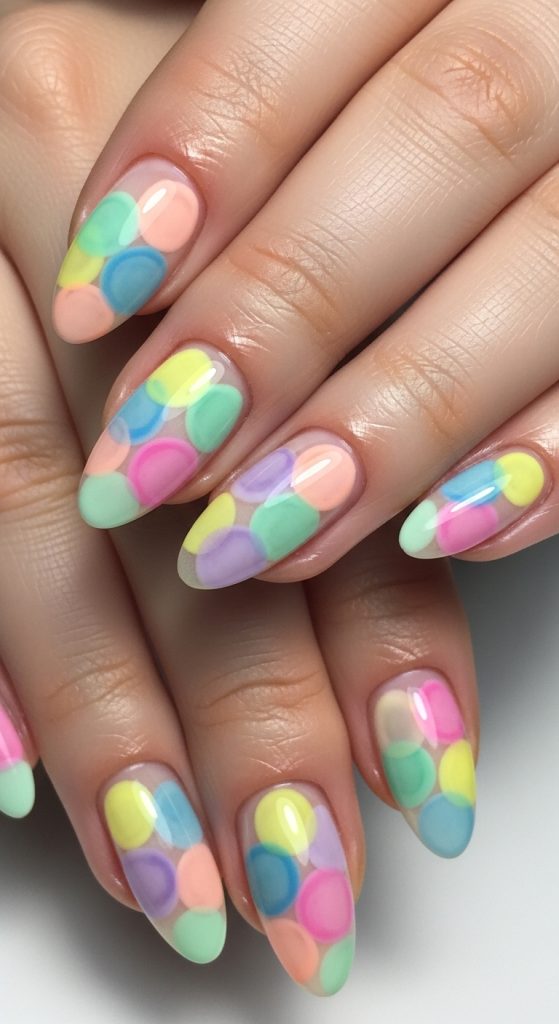
11. Pastel Rainbow Polka Layers
This design stacks pastel dots in soft overlapping layers, creating a dreamy watercolor effect. Instead of harsh contrast, the colors blend visually into a gentle rainbow haze. The manicure feels artistic, airy, and light — perfect for spring and romantic aesthetics.

Layering pastel dots gives depth without looking crowded. The softness makes it wearable for everyday life while still being playful. It’s ideal for people who love color but prefer a muted palette.
How to Create the Look
Apply a sheer nude base. Add pastel dots in random placement. Let dry. Add a second layer of dots slightly offset from the first. Seal with glossy top coat.
Materials Needed
- Sheer nude polish
- Pastel polish set
- Dotting tool
- Glossy top coat
12. Black and Bright Contrast Dots
A black base with neon or bright dots creates striking contrast. This style feels bold and graphic, almost comic-book inspired. The darkness of the base makes the dots glow visually.
Perfect for statement nails.
How to Create the Look
Paint nails black and allow full drying. Add bright dots evenly spaced. Keep dot size consistent. Seal with gloss.
Materials Needed
- Black polish
- Bright neon polish
- Dotting tool
- Top coat
13. Tiny White Dot Minimalism
Micro white dots on a clear or nude base create delicate elegance. This design is subtle yet detailed. It’s perfect for people who prefer quiet nail art that still feels intentional.

Ideal for work-friendly manicures.
How to Create the Look
Apply sheer base. Add evenly spaced micro white dots using the smallest dotting tip. Seal carefully.
Materials Needed
- Nude polish
- White polish
- Fine dotting tool
- Top coat
14. Mixed Size Retro Dots
Combining large and small dots creates a playful retro vibe. The variation adds rhythm and movement to the design. This look feels vintage but modernized through color choice.
Great for creative personalities.

How to Create the Look
Paint base color. Add large dots first. Fill gaps with smaller dots. Balance spacing visually. Seal with gloss.
Materials Needed
- Base polish
- Contrasting dot polish
- Multiple dotting tools
- Top coat
15. Glitter Polka Accent Nails
Glitter dots add sparkle without overwhelming the manicure. Instead of full glitter polish, the dots act as shining accents. This keeps the look refined.
Perfect for festive occasions.

How to Create the Look
Apply solid base color. Use glitter polish to create dots. Add two layers for opacity. Seal with thick top coat.
Materials Needed
- Base polish
- Glitter polish
- Dotting tool
- Thick glossy top coat
16. Diagonal Dot Pattern
Dots arranged diagonally create a structured geometric effect. This pattern feels modern and clean. It transforms polka dots into graphic design.

Great for minimalist lovers.
How to Create the Look
Paint neutral base. Create a diagonal line of evenly spaced dots across each nail. Repeat pattern consistently.
Materials Needed
- Neutral base polish
- Dot polish
- Dotting tool
- Top coat
17. Ombre Dot Transition
This design uses color gradient dots from dark to light across the nail. It mimics ombre without blending polish directly.

Elegant and artistic.
How to Create the Look
Choose 3–4 shades of the same color family. Add darkest dots near cuticle. Gradually transition to lightest shade toward tip.
Materials Needed
- Gradient color polish set
- Dotting tool
- Base coat
- Top coat
18. Transparent Jelly Dot Nails
Jelly polish creates a see-through glossy effect. Colored dots float inside translucent layers, giving depth.
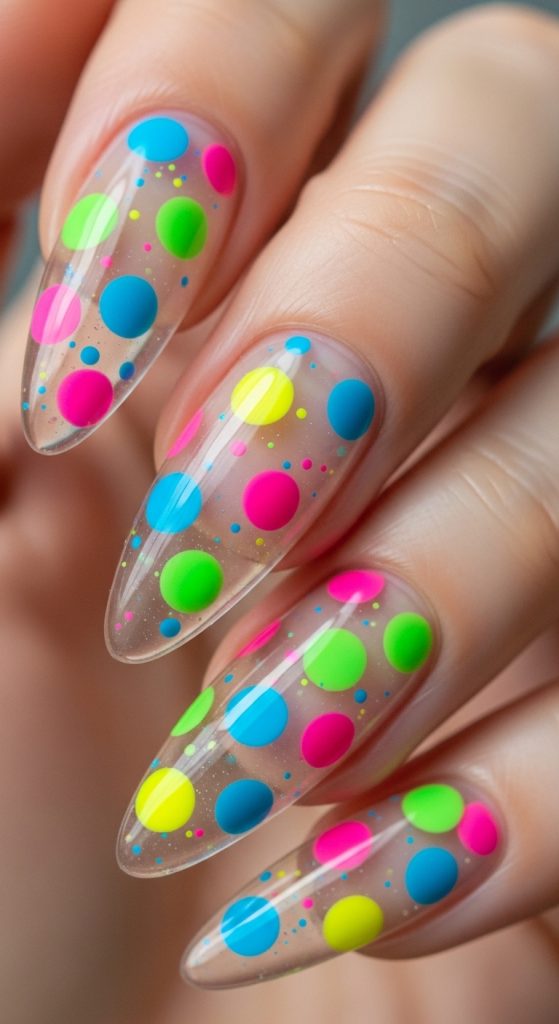
Modern and trendy.
How to Create the Look
Apply clear jelly base. Add colored dots. Seal with jelly top coat for glassy finish.
Materials Needed
- Jelly polish
- Bright dot polish
- Dotting tool
- Glossy top coat
19. Side Border Polka Dots
Dots placed along one edge of the nail create asymmetrical elegance. It’s subtle but stylish.

Perfect for modern minimal looks.
How to Create the Look
Paint nude base. Add a vertical row of dots along one side. Keep spacing precise.
Materials Needed
- Nude polish
- Dot polish
- Dotting tool
- Top coat
20. Full Rainbow Polka Explosion
This design covers the entire nail with multi-colored dots. It’s maximalist, joyful, and expressive.
A celebration manicure.
How to Create the Look

Apply white base. Add dots in every color. Fill gaps evenly. Seal with glossy top coat.
Materials Needed
- White polish
- Full rainbow polish set
- Dotting tools
- Thick top coat