Milky nails with glitter are the perfect blend of soft elegance and subtle sparkle. This nail trend combines the creamy, semi-sheer beauty of milky nail shades with delicate glitter accents that elevate the look without overpowering it. The result is a manicure that feels luxurious, feminine, and versatile—ideal for everyday wear, special occasions, weddings, holidays, and minimal-glam lovers.

Milky nail colors are loved for their ability to smooth the appearance of the nail bed while giving a clean, polished finish. When paired with glitter, they transform from simple to eye-catching while still maintaining a refined aesthetic. This balance is why milky glitter nails are so popular on Pinterest—they photograph beautifully, work on all nail lengths and shapes, and appeal to both minimalists and sparkle lovers.
One of the biggest advantages of milky glitter nails is customization. The glitter can be fine or chunky, subtle or bold, placed as an accent or layered across the entire nail. Whether you prefer short natural nails or long sculpted shapes, milky glitter designs adapt effortlessly. They also complement all skin tones and fit seamlessly into bridal, office-appropriate, and party-ready nail styles.
Another reason this trend continues to grow is its beginner-friendly nature. Many milky glitter designs rely on simple placement techniques rather than complex nail art. Even at home, these looks can be achieved using basic tools, sheer polish, and glitter top coats. At the salon, they can be elevated with chrome powders, encapsulated glitter, or layered gel techniques.
In this two-part guide, you will explore 20 milky nail ideas with glitter, broken into two detailed sections. Each idea includes a clear explanation, easy step-by-step instructions, and a list of tools or materials needed. These designs are practical, elegant, and perfectly optimized for Pinterest inspiration boards.
Below is Part 1, featuring the first 10 milky glitter nail ideas.
1. Classic Milky Nails with Fine Glitter
Introduction
This is the most timeless version of milky glitter nails. Fine glitter adds a soft sparkle that catches the light without looking heavy or dramatic.

What This Nail Look Is
A milky nude or pink base layered with ultra-fine glitter.
How to Achieve It
- Shape and prep nails.
- Apply a base coat.
- Apply two thin coats of milky polish.
- Lightly layer fine glitter polish.
- Seal with glossy top coat.
Tools / Materials Used
- Nail file
- Base coat
- Milky nail polish
- Fine glitter polish
- Top coat
2. Milky Glitter Accent Nails

Introduction
Accent nails are perfect for adding sparkle while keeping the overall look minimal and clean.
What This Nail Look Is
Milky nails with one or two fully glittered accent nails.
How to Achieve It
- Apply milky polish to all nails.
- Choose one or two accent nails.
- Apply glitter polish fully on accent nails.
- Seal all nails with top coat.
Tools / Materials Used
- Milky nail polish
- Glitter polish
- Base coat
- Top coat
3. Milky Pink Nails with Subtle Shimmer

Introduction
This look is soft, feminine, and perfect for everyday wear.
What This Nail Look Is
Milky pink nails with barely-there shimmer mixed into the polish.
How to Achieve It
- Prep nails and apply base coat.
- Apply milky pink polish with shimmer.
- Build thin layers.
- Finish with glossy top coat.
Tools / Materials Used
- Milky pink shimmer polish
- Base coat
- Top coat
4. Milky Nails with Glitter French Tips
Introduction
Glitter French tips offer a modern twist on a classic manicure.
What This Nail Look Is
Milky base with glitter applied only to the tips.

How to Achieve It
- Apply milky base color.
- Use a liner brush to apply glitter at tips.
- Keep the glitter line thin.
- Seal with top coat.
Tools / Materials Used
- Milky polish
- Glitter polish
- Nail art brush
- Top coat
5. Milky White Nails with Silver Glitter
Introduction
Silver glitter adds a clean, icy sparkle that pairs beautifully with milky white tones.
What This Nail Look Is
Milky white nails layered with fine silver glitter.
How to Achieve It
- Apply milky white base.
- Add silver glitter lightly.
- Concentrate sparkle toward tips.
- Finish with glossy top coat.

Tools / Materials Used
- Milky white polish
- Silver glitter polish
- Top coat
6. Milky Nails with Glitter Ombre
Introduction
Glitter ombre nails create a soft fade that looks elegant and polished.

What This Nail Look Is
Milky nails with glitter concentrated at the tips and fading upward.
How to Achieve It
- Apply milky base color.
- Dab glitter near the tips using a sponge.
- Blend upward gently.
- Seal with top coat.
Tools / Materials Used
- Makeup sponge
- Milky polish
- Glitter polish
- Top coat
7. Milky Nude Nails with Gold Glitter

Introduction
Gold glitter brings warmth and luxury to milky nude nails.
What This Nail Look Is
A nude milky base with subtle gold sparkle.
How to Achieve It
- Apply milky nude polish.
- Add gold glitter lightly.
- Keep sparkle minimal.
- Finish with top coat.
Tools / Materials Used
- Milky nude polish
- Gold glitter polish
- Top coat
8. Short Milky Nails with Glitter
Introduction
Short nails can look just as glamorous with the right glitter placement.

What This Nail Look Is
Short, neatly shaped nails with milky polish and fine glitter.
How to Achieve It
- Trim and shape nails short.
- Apply base coat.
- Apply milky polish.
- Add fine glitter layer.
- Seal with top coat.
Tools / Materials Used
- Nail clippers
- Nail file
- Milky polish
- Glitter polish
9. Milky Nails with Chunky Glitter Accents
Introduction
Chunky glitter adds a bold contrast to soft milky nails when used sparingly.

What This Nail Look Is
Milky base with chunky glitter placed on accent nails or near cuticles.
How to Achieve It
- Apply milky polish.
- Use a dotting tool to place chunky glitter.
- Keep placement controlled.
- Seal carefully with top coat.
Tools / Materials Used
- Chunky glitter
- Dotting tool
- Milky polish
- Top coat
10. Milky Nails with Glitter Cuticle Detail
Introduction
Glitter near the cuticle creates a delicate, jewelry-like effect.
What This Nail Look Is
Milky nails with fine glitter placed close to the cuticle area.

How to Achieve It
- Apply milky base color.
- Add glitter near cuticles using a small brush.
- Blend upward slightly.
- Seal with glossy top coat.
Tools / Materials Used
- Fine glitter polish
- Nail art brush
- Milky polish
- Top coat
11. Milky Pink Nails with Micro Glitter
Introduction

Micro glitter creates a soft, barely-there sparkle that looks refined and elegant on milky pink nails. This design is ideal for everyday wear and professional settings where subtle glamour is preferred.
What This Nail Look Is
A milky pink base infused with ultra-fine micro glitter for a smooth, glowing finish.
How to Achieve It
- Prep nails and apply base coat.
- Apply two thin coats of milky pink polish.
- Add a micro-glitter layer evenly.
- Seal with glossy top coat.
Tools / Materials Used
- Milky pink polish
- Micro glitter polish
- Base coat
- Top coat
12. Milky Nails with Holographic Glitter

Introduction
Holographic glitter adds dimension and rainbow reflection while keeping the soft milky base intact.
What This Nail Look Is
Milky nails layered with holographic glitter particles.
How to Achieve It
- Apply milky base color.
- Lightly tap holographic glitter over nails.
- Distribute evenly.
- Seal with top coat.
Tools / Materials Used
- Milky polish
- Holographic glitter
- Applicator sponge
- Top coat
13. Milky Nails with Glitter Fade Tips
Introduction
Glitter fade tips give nails a soft gradient sparkle that looks clean and modern.

What This Nail Look Is
Milky base with glitter concentrated at the tips and softly fading downward.
How to Achieve It
- Apply milky polish.
- Dab glitter near tips using sponge.
- Blend gently upward.
- Seal with glossy top coat.
Tools / Materials Used
- Makeup sponge
- Milky polish
- Glitter polish
- Top coat
14. Milky Almond Nails with Glitter
Introduction
Almond-shaped nails enhance the elegance of milky glitter designs by elongating the fingers.
What This Nail Look Is
Milky glitter polish applied to almond-shaped nails.
How to Achieve It
- File nails into almond shape.
- Prep and apply base coat.
- Apply milky glitter polish.
- Finish with top coat.
Tools / Materials Used
- Nail file
- Milky glitter polish
- Base coat
- Top coat
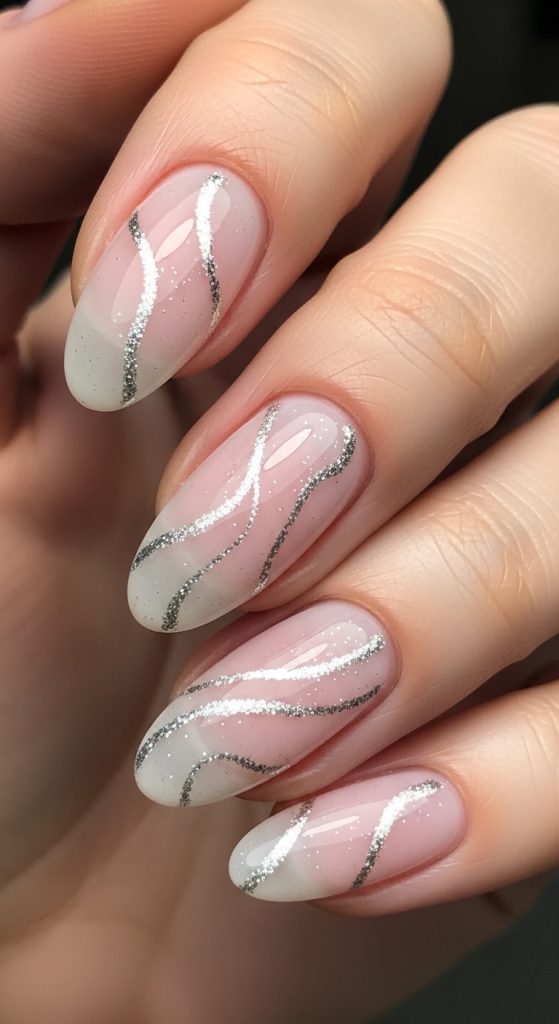
15. Milky Nails with Glitter Swirls
Introduction
Glitter swirls add a trendy, artistic element while keeping the base soft and clean.
What This Nail Look Is
Milky nails decorated with thin glitter swirl lines.

How to Achieve It
- Apply milky base.
- Use liner brush to draw swirl patterns.
- Keep designs minimal.
- Seal with top coat.
Tools / Materials Used
- Nail art liner brush
- Glitter polish
- Milky polish
- Top coat
16. Milky Nails with Glitter Stripes
Introduction

Glitter stripes create a sleek and modern nail look with minimal effort.
What This Nail Look Is
Milky nails with thin vertical or horizontal glitter lines.
How to Achieve It
- Apply milky base.
- Use striping brush for lines.
- Let design dry.
- Seal with glossy top coat.
Tools / Materials Used
- Striping brush
- Glitter polish
- Milky polish
- Top coat
17. Milky Nails with Glitter Encapsulation
Introduction
Encapsulated glitter creates a smooth, glass-like finish that looks luxurious and salon-quality.
What This Nail Look Is
Glitter sealed beneath a clear gel layer over milky polish.
How to Achieve It

- Apply milky base and cure.
- Place glitter on nail.
- Encapsulate with clear gel.
- Cure and finish with top coat.
Tools / Materials Used
- Gel base coat
- Milky gel polish
- Loose glitter
- Clear builder gel
- UV/LED lamp
18. Milky Nails with Glitter Floral Accents
Introduction
Glitter floral accents add a romantic and feminine touch to milky nails.

What This Nail Look Is
Milky base with small glitter floral designs on accent nails.
How to Achieve It
- Apply milky base.
- Use fine brush to paint flowers.
- Add glitter centers.
- Seal with top coat.
Tools / Materials Used
- Fine nail art brush
- Glitter polish
- Milky polish
- Top coat
19. Milky Nails with Glitter Heart Details
Introduction
Heart-shaped glitter accents create a cute and playful nail design without overwhelming the milky base.
What This Nail Look Is
Milky nails featuring small glitter heart designs.

How to Achieve It
- Apply milky base.
- Use nail art brush or stickers for hearts.
- Place sparingly.
- Seal with top coat.
Tools / Materials Used
- Nail art brush or stickers
- Glitter polish
- Milky polish
- Top coat
20. Milky Nails with All-Over Glitter Top Coat
Introduction
This design offers maximum sparkle while maintaining a soft milky foundation.
What This Nail Look Is
Milky nails topped with a sheer glitter top coat across all nails.
How to Achieve It
- Apply milky base polish.
- Apply sheer glitter top coat evenly.
- Let dry completely.
- Add second top coat if needed.
Tools / Materials Used

- Milky polish
- Glitter top coat
- Base coat