Simple fake nail designs are trending more than ever. While bold, extra-long, heavily decorated nails dominate social media, there’s a strong shift toward clean, wearable, and elegant nail looks. Simple designs are versatile, beginner-friendly, and suitable for everyday life — whether you’re going to work, school, brunch, or a special event. The beauty of fake nails is that they allow you to achieve a polished manicure instantly without waiting for natural nails to grow.

Press-on nails and acrylic sets have evolved significantly in quality and style. Today’s fake nails can look completely natural, especially when paired with minimalistic designs. Soft French tips, glossy nude finishes, subtle shimmer, and tiny accent details create chic results without overwhelming the hands. Simplicity often looks more expensive and refined.
Another advantage of simple fake nail designs is their flexibility. They suit all nail shapes — square, almond, coffin, oval, and short round. You don’t need professional nail art skills to recreate many of these styles. With basic tools like nail glue, a file, polish, and a few detailing brushes, you can achieve salon-worthy results at home.
Simple designs also photograph beautifully. Clean lines, neutral tones, and soft finishes are highly Pinterest-friendly and work with almost any outfit. They’re timeless, meaning you won’t feel bored after a few days.
In this guide, you’ll discover 20 simple fake nail design ideas that are stylish, easy to recreate, and perfect for beginners. Each idea includes step-by-step instructions and materials needed so you can confidently create your own elegant nail set.
Let’s begin with the first 10 designs.
1. Classic Nude Glossy Nails
Nude glossy nails are the ultimate definition of simple elegance. This design focuses on a clean, neutral polish with a high-shine finish. It works beautifully on short square, oval, or almond-shaped fake nails and suits every skin tone.

The beauty of nude nails lies in their versatility. They match every outfit and occasion while still looking polished and intentional. Glossy nude fake nails give the illusion of healthy, natural nails but with perfect shape and durability.
Step-by-Step How-To
- Choose nude press-on nails or apply nude gel polish to plain fake nails.
- File edges for smooth shape.
- Apply thin base coat if painting yourself.
- Apply two thin coats of nude polish.
- Let dry completely.
- Finish with high-gloss top coat.
- Clean edges with small brush and remover if needed.
Materials Needed
• Nude nail polish or gel
• Base coat
• Glossy top coat
• Nail file
• Nail glue (if applying press-ons)
Beginner Tip
Choose a nude shade slightly lighter than your skin tone for a clean look.
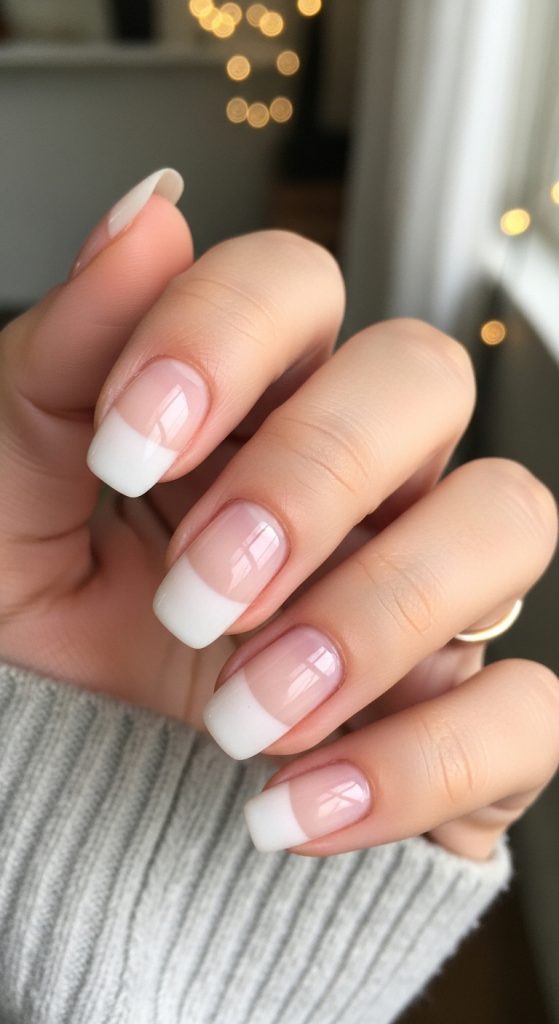
2. Soft French Tip
The soft French tip is timeless and classy. Instead of harsh white lines, this version uses a thinner, more delicate tip for a modern feel.

This style looks beautiful on short fake nails and works especially well for professional settings.
Step-by-Step
- Apply sheer pink or nude base polish.
- Let dry fully.
- Use a thin brush to draw soft white tip line.
- Keep the tip thin for minimalist effect.
- Seal with glossy top coat.
Materials
• Sheer pink polish
• White nail polish
• Thin nail art brush
• Top coat
Beginner Tip
Use French tip guides for cleaner lines.
3. Milky White Nails
Milky white nails are soft, clean, and very Pinterest-popular. This semi-transparent white gives a delicate finish that looks expensive but simple.
Step-by-Step
- Apply clear or milky base coat.
- Add two thin layers of milky white polish.
- Finish with glossy top coat.
Materials
• Milky white polish
• Base coat
• Top coat
Beginner Tip
Apply thin layers to avoid streaks.
4. Minimal Dot Accent
This design adds one small dot on each nail near the cuticle. It’s subtle but stylish.
Step-by-Step
- Apply nude or pastel base.
- Use dotting tool to add tiny dot near cuticle.
- Seal with top coat.
Materials

• Base polish
• Dotting tool
• Accent color polish
Beginner Tip
Keep dots centered for clean look.
5. Glossy Clear Nails
Clear fake nails with glossy finish create a chic modern look. They’re extremely simple but trendy.

Step-by-Step
- Apply clear press-on nails.
- Shape edges smoothly.
- Add clear glossy top coat.
Materials
• Clear fake nails
• Nail glue
• Top coat
Beginner Tip
Keep nails short for wearable style.
6. Soft Pink Gloss Nails
Soft pink glossy nails are delicate, feminine, and effortlessly classy. This design is perfect if you want something simple yet slightly more colorful than nude. The soft pink tone enhances the natural look of fake nails while adding a subtle pop of warmth.

This style works beautifully on short square, oval, or almond-shaped press-ons. It’s ideal for everyday wear, work settings, or special events where you want a clean and polished manicure without heavy nail art.
Step-by-Step How-To
- Apply fake nails and shape them to your preference.
- Apply a thin base coat if painting.
- Add two thin coats of soft pink polish.
- Allow each coat to dry fully before layering.
- Seal with a high-gloss top coat for shine.
- Clean edges with small brush dipped in remover.
Materials Needed
• Soft pink nail polish
• Base coat
• Glossy top coat
• Nail file
• Nail glue
Beginner Tip
Choose a pink shade close to your natural nail bed for a seamless look.
7. Minimal Glitter Accent Nail
If you want a little sparkle while keeping things simple, a glitter accent nail is perfect. Instead of decorating every nail, choose one nail per hand (usually the ring finger) and apply fine glitter polish.
This design keeps the overall manicure clean while adding subtle glam.
Step-by-Step
- Apply nude, pink, or white base polish on all nails.
- On one nail per hand, apply fine glitter polish.
- Add two coats for full coverage.
- Seal all nails with glossy top coat.
Materials
• Neutral base polish
• Fine glitter polish
• Top coat

Beginner Tip
Use fine shimmer glitter rather than chunky glitter for a minimalist look.
8. Short Square Matte Nails

Matte nails create a modern, soft finish. Instead of shine, this design focuses on texture. Matte beige, blush, or soft grey fake nails look extremely chic and trendy.
This style works especially well on short square shapes because it enhances clean lines.
Step-by-Step
- Apply base color of your choice.
- Let polish dry completely.
- Apply matte top coat evenly.
- Allow matte coat to fully dry without touching.
Materials
• Beige, blush, or grey polish
• Matte top coat
• Nail file
• Nail glue
Beginner Tip
Apply matte coat evenly to avoid streaky patches.
9. Thin Line Detail Nails
Thin line nail art is simple but elegant. A single vertical or diagonal line in gold, white, or black creates a minimalist design that looks high-end.
This design works beautifully on almond or coffin-shaped fake nails.

Step-by-Step
- Apply neutral base color.
- Let dry fully.
- Use a thin nail art brush to draw one clean line on each nail.
- Keep line centered or slightly diagonal.
- Seal with glossy top coat.
Materials
• Neutral polish
• Thin nail art brush
• Accent polish (gold, black, white)
• Top coat
Beginner Tip
Rest your hand on a flat surface for steady lines.
10. Sheer Pink “Your Nails But Better” Look
This design enhances natural-looking fake nails with a sheer pink polish. It creates a healthy, clean manicure that’s subtle and timeless.
This is perfect for beginners because it requires no detailed art.

Step-by-Step
- Apply fake nails and shape them.
- Apply one thin coat of sheer pink polish.
- Add second thin layer for slightly more color.
- Finish with glossy top coat.
- Apply cuticle oil for clean finish.
Materials
• Sheer pink polish
• Glossy top coat
• Nail file
• Cuticle oil
Beginner Tip
Keep layers thin to maintain transparency.
11. Soft Ombre Nude Nails
Soft ombre nude nails blend two neutral shades seamlessly, creating a subtle gradient effect. This design looks professional, elegant, and very Pinterest-worthy while still remaining simple. It works beautifully on almond or coffin-shaped fake nails but also looks clean on short square sets.

The soft fade from light beige to blush pink gives dimension without looking busy. It’s ideal for weddings, work settings, or everyday wear.
Step-by-Step How-To
- Apply light nude polish as base and let dry.
- Dab slightly darker nude or blush polish onto a makeup sponge.
- Gently tap sponge onto nail tips to create gradient.
- Repeat until blended.
- Seal with glossy top coat to smooth the fade.
Materials Needed
• Light nude polish
• Blush or darker nude polish
• Makeup sponge
• Glossy top coat
• Nail glue
Beginner Tip
Apply thin layers to avoid a thick finish.
12. Micro French Tip

The micro French tip is a thinner, more delicate version of the traditional French manicure. Instead of thick white tips, this design features a very slim line at the edge of the nail.
This style looks modern, minimal, and very clean. It’s especially flattering on short fake nails.
Step-by-Step
- Apply sheer pink or nude base.
- Let dry completely.
- Using a thin brush, paint a very slim white line at the tip.
- Keep the line subtle and even.
- Finish with glossy top coat.
Materials
• Sheer pink polish
• White nail polish
• Thin nail art brush
• Top coat
Beginner Tip
Rotate your finger instead of the brush for smoother lines.
13. Nude Nails with Tiny Heart Accent
A tiny heart on one nail adds charm while keeping the design simple. This is perfect for Valentine’s Day or everyday cute aesthetics.

Step-by-Step
- Apply nude or pink base polish.
- Use dotting tool to create two small dots close together.
- Connect dots into a small heart shape using thin brush.
- Let design dry fully.
- Seal with top coat.
Materials
• Nude polish
• Red or white polish
• Dotting tool
• Thin brush
• Top coat
Beginner Tip
Keep the heart small for a minimalist finish.
14. Clear Nails with Gold Foil Accent
Gold foil adds subtle luxury to simple clear fake nails. The transparent base keeps it minimal, while foil adds texture and shine.
Step-by-Step
- Apply clear fake nails.
- Add thin layer of clear polish.
- Press small pieces of gold foil onto nail.
- Let dry slightly.
- Seal with thick glossy top coat.
Materials
• Clear fake nails
• Gold foil flakes
• Clear polish
• Glossy top coat

Beginner Tip
Use tiny foil pieces instead of large chunks for balance.
15. Soft Grey Minimal Nails
Soft grey nails are neutral yet modern. This design is perfect for fall or winter while remaining simple and classy.
Step-by-Step

- Apply two thin coats of soft grey polish.
- Let dry completely.
- Seal with glossy or matte top coat.
Materials
• Soft grey nail polish
• Base coat
• Top coat
Beginner Tip
Grey looks best with clean nail shape and smooth edges.
16. Thin Glitter French Tip
Instead of a white tip, this version uses a thin glitter line. It’s simple but slightly glamorous.

Step-by-Step
- Apply nude base polish.
- Use thin brush to apply glitter polish along tip.
- Keep glitter line thin and even.
- Seal with glossy top coat.
Materials
• Nude polish
• Fine glitter polish
• Thin brush
• Top coat
Beginner Tip
Fine shimmer works better than chunky glitter.
17. White Short Square Nails
Solid white nails are bold yet simple. On short square fake nails, this design looks clean and fresh.

Step-by-Step
- Apply base coat.
- Add two coats of white polish.
- Let dry fully.
- Seal with glossy top coat.
Materials
• White nail polish
• Base coat
• Glossy top coat
Beginner Tip
Use thin layers to avoid streaks.
18. Beige Nails with Gold Line
A single thin gold line across the nail adds elegance to neutral beige polish.
Step-by-Step
- Apply beige base polish.
- Let dry fully.
- Use thin brush to draw horizontal gold line across nail.
- Seal with glossy top coat.
Materials

• Beige polish
• Gold nail art polish
• Thin brush
• Top coat
Beginner Tip
Keep line centered for clean aesthetic.
19. Short Almond Natural Gloss Nails
Short almond-shaped fake nails with clear gloss create a natural yet sculpted look. This style focuses on shape rather than color.
Step-by-Step
- Apply almond-shaped clear or nude fake nails.
- File for smooth finish.
- Apply clear glossy top coat.
- Finish with cuticle oil.
Materials

• Almond-shaped fake nails
• Nail file
• Clear top coat
• Cuticle oil
Beginner Tip
Keep nails slightly short for wearable elegance.
20. Minimal Black Line Accent
This design features one thin black line across a nude or clear base. It’s modern, simple, and slightly edgy.
Step-by-Step
- Apply nude or sheer base polish.
- Let dry completely.
- Use thin brush to draw one straight black line across nail.
- Seal with glossy top coat.

Materials
• Nude polish
• Black nail art polish
• Thin brush
• Top coat
Beginner Tip
Use tape guide if you struggle with straight lines.