Short oval nails are the perfect balance between elegance and practicality. They combine the softness of rounded edges with the clean length of short nails, making them ideal for everyday wear. Unlike long acrylic styles that can feel dramatic or difficult to manage, short oval nails are comfortable, natural-looking, and universally flattering.

The oval shape slightly elongates the fingers without requiring extra length. It softens the hands, making them appear more delicate and refined. Because the edges are rounded rather than squared, oval nails are less likely to snag or break, which makes them perfect for work, school, typing, or active lifestyles.
One of the biggest reasons short oval nails are trending on Pinterest is their versatility. They look stunning in glossy nudes, milky whites, pastel tones, minimal nail art, and even bold colors. The curved shape complements simple designs especially well because it creates a smooth, feminine silhouette.
Another advantage of short oval nails is that they suit all age groups and fashion styles. Whether your aesthetic is minimalist, soft glam, trendy, or classic, there’s a short oval nail design that fits perfectly. From subtle French tips to modern line art, these nails photograph beautifully and pair with almost any outfit.
If you’re new to doing your nails at home, short oval shapes are also easier to file and maintain compared to sharp coffin or stiletto shapes. They require less product, less shaping time, and are more forgiving if you’re a beginner.
In this guide, you’ll discover 20 simple, stylish, and Pinterest-worthy short oval nail ideas. Each design includes step-by-step instructions and materials needed so you can recreate them confidently at home or request them at the salon.
Let’s begin with the first 10 ideas.
1. Glossy Nude Short Oval Nails
Glossy nude nails are timeless and effortlessly chic. On short oval nails, nude shades enhance the natural elegance of the shape while keeping the overall look clean and polished. This style works for every occasion — from professional settings to casual brunch.

The oval shape makes nude tones look softer and more refined compared to square shapes. Choose a nude shade that complements your skin tone for the most flattering finish.
Step-by-Step How-To
- Shape nails into a soft oval using a nail file.
- Apply a thin base coat and let dry.
- Apply two thin coats of nude polish.
- Allow each coat to dry fully.
- Finish with high-gloss top coat.
- Apply cuticle oil for a clean finish.
Materials Needed
• Nude nail polish
• Base coat
• Glossy top coat
• Nail file
• Cuticle oil
Beginner Tip
Keep layers thin to avoid streaking.
2. Milky White Oval Nails
Milky white nails are soft, creamy, and very Pinterest-popular. They look delicate on short oval nails and give a “clean girl aesthetic” vibe.
This semi-sheer white shade adds brightness without looking harsh like pure white polish.
Step-by-Step
- Shape nails into oval.
- Apply clear base coat.
- Add two thin layers of milky white polish.
- Let dry thoroughly.
- Seal with glossy top coat.

Materials
• Milky white polish
• Base coat
• Top coat
Beginner Tip
Apply thin coats for smooth finish.
3. Soft Pink Gloss Oval Nails
Soft pink is feminine, subtle, and flattering on all skin tones. On short oval nails, it enhances the rounded shape beautifully.
This is perfect for everyday wear and looks natural yet polished.

Step-by-Step
- File nails into oval shape.
- Apply base coat.
- Apply two thin coats of soft pink polish.
- Finish with glossy top coat.
Materials
• Soft pink polish
• Base coat
• Top coat
Beginner Tip
Choose pink slightly lighter than natural nail bed.
4. Micro French Tip Oval Nails
The micro French tip gives a modern twist to the classic French manicure. Instead of thick white tips, this version uses a very thin line.
Step-by-Step
- Apply sheer pink base.
- Use thin brush to paint slim white tip.
- Keep line delicate.
- Seal with glossy top coat.
Materials

• Sheer pink polish
• White polish
• Thin nail brush
• Top coat
Beginner Tip
Rotate finger instead of brush for smoother curve.
5. Sheer Gloss “Natural” Oval Nails
This design enhances your natural nails with clear or very light pink gloss.
Step-by-Step

- Shape nails oval.
- Apply one coat of sheer polish.
- Add glossy top coat.
- Finish with cuticle oil.
Materials
• Sheer pink polish
• Glossy top coat
• Nail file
Beginner Tip
Buff nails lightly before polishing
6. Short Oval Nails with Thin Gold Line
A single thin gold line across a nude or soft pink base instantly elevates short oval nails. This design is minimal but feels luxurious and modern. The curved shape of oval nails makes horizontal or vertical gold lines look softer and more elegant compared to sharp square shapes.

This is perfect for those who want something simple yet slightly unique. It works beautifully for weddings, events, or everyday chic styling.
Step-by-Step How-To
- Shape nails into a smooth oval.
- Apply nude or blush base polish and let dry fully.
- Using a thin nail art brush, draw a delicate gold line across the center or near the tip.
- Keep the line thin and straight.
- Seal with a glossy top coat.
Materials Needed
• Nude or blush polish
• Gold nail art polish
• Thin nail art brush
• Glossy top coat
• Nail file
Beginner Tip
Rest your hand on a flat surface for steadier lines.
7. Matte Beige Short Oval Nails
Matte finishes add a modern twist to classic neutral colors. Beige or taupe matte polish on short oval nails creates a soft, trendy aesthetic that looks effortlessly stylish.
The oval shape enhances the softness of the matte texture, making the design look cozy yet refined.
Step-by-Step

- Shape nails into oval.
- Apply base coat and let dry.
- Apply two thin coats of beige or taupe polish.
- Allow polish to dry completely.
- Apply matte top coat evenly.
Materials
• Beige or taupe polish
• Base coat
• Matte top coat
• Nail file
Beginner Tip
Apply matte top coat evenly to avoid streaks.
8. Minimal Dot Accent Oval Nails
A tiny dot near the cuticle adds a subtle decorative touch while keeping the design clean and simple. This idea is perfect for beginners because it requires very little detail work.

Short oval nails look especially cute with small centered dots in white, black, or gold.
Step-by-Step
- Apply neutral base polish (nude, pink, or white).
- Let dry completely.
- Use a dotting tool or toothpick to place a small dot near the cuticle.
- Repeat on each nail or only on one accent nail.
- Seal with glossy top coat.
Materials
• Neutral base polish
• Accent color polish
• Dotting tool
• Top coat
Beginner Tip
Keep the dot small for a minimalist aesthetic.
9. Short Oval Soft Grey Nails
Soft grey nails are elegant, modern, and versatile. On short oval nails, grey looks balanced and refined rather than bold. It’s an excellent alternative to nude for those who want something neutral but slightly different.
This shade works well year-round and pairs beautifully with silver jewelry.
Step-by-Step

- File nails into an oval shape.
- Apply a thin base coat.
- Apply two thin coats of soft grey polish.
- Allow each coat to dry thoroughly.
- Finish with glossy or matte top coat.
Materials
• Soft grey polish
• Base coat
• Glossy or matte top coat
• Nail file
Beginner Tip
Choose cool-toned grey for a clean, modern finish.
10. Short Oval White Gloss Nails
Solid white polish on short oval nails creates a fresh, bright look. Unlike long white nails that can feel dramatic, short oval white nails look clean and stylish.

This design is especially beautiful during summer but works year-round.
Step-by-Step
- Shape nails into smooth oval.
- Apply base coat and let dry.
- Apply two thin coats of white polish.
- Allow polish to dry fully.
- Seal with high-gloss top coat.
Materials
• White nail polish
• Base coat
• Glossy top coat
• Nail file
Beginner Tip
Use thin layers to avoid streaky white polish.
11. Short Oval Nude Ombre Nails
Nude ombre nails blend two soft neutral tones into a seamless gradient. On short oval nails, this creates dimension without overwhelming the shape. The soft fade enhances the natural elegance of the oval curve.

This design is perfect for weddings, office wear, or anyone who loves subtle but polished manicures.
Step-by-Step How-To
- Shape nails into a soft oval.
- Apply light nude polish as base and let dry.
- Dab slightly darker nude or blush polish onto a makeup sponge.
- Gently tap sponge onto nail tips to create gradient effect.
- Repeat lightly until blended.
- Seal with glossy top coat to smooth the fade.
Materials Needed
• Light nude polish
• Blush or darker nude polish
• Makeup sponge
• Glossy top coat
• Nail file
Beginner Tip
Blend gently to avoid harsh lines.
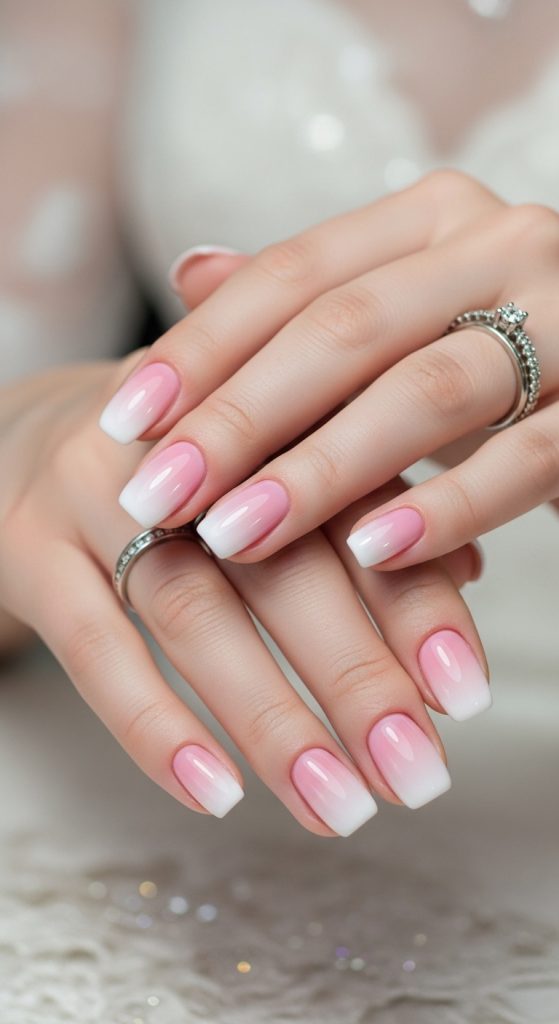
12. Short Oval French Fade (Baby Boomer Style)
The French fade, also called Baby Boomer nails, blends white tips softly into a pink base instead of using a sharp line. It’s softer than a traditional French tip and perfect for oval shapes.
Step-by-Step
- Apply soft pink base coat.
- Let dry completely.
- Use a sponge to dab white polish lightly onto tips.
- Blend upward for smooth fade.
- Seal with glossy top coat.
Materials
• Soft pink polish
• White polish
• Makeup sponge
• Glossy top coat
Beginner Tip
Use very little white polish for a subtle gradient.
13. Short Oval Clear Gloss Nails
Clear gloss nails focus on shape rather than color. The oval shape becomes the highlight, giving a natural and refined look.
This is ideal for minimalists who want healthy-looking nails.
Step-by-Step
- File nails into oval shape.
- Buff nail surface lightly.
- Apply clear base coat.
- Finish with thick glossy top coat.
- Apply cuticle oil.

Materials
• Nail file
• Buffer
• Clear polish
• Top coat
• Cuticle oil
Beginner Tip
Buff gently for smooth shine.
14. Short Oval Pastel Blue Nails
Pastel blue on short oval nails looks soft and trendy without being bold. The curved shape enhances the delicate vibe of pastel shades.
Step-by-Step

- Shape nails into oval.
- Apply base coat.
- Apply two thin coats of pastel blue polish.
- Let dry fully.
- Seal with glossy top coat.
Materials
• Pastel blue polish
• Base coat
• Glossy top coat
• Nail file
Beginner Tip
Keep nails short for wearable pastel style.
15. Short Oval Pink and White Double Line
A thin double line at the tip (white and pink) adds subtle detail without overwhelming the nail.
Step-by-Step

- Apply sheer nude base.
- Use thin brush to draw white line at tip.
- Draw thin pink line just below it.
- Keep lines delicate and even.
- Seal with top coat.
Materials
• Nude polish
• White polish
• Pink polish
• Thin nail art brush
• Top coat
Beginner Tip
Keep lines extremely thin for a modern look.
16. Short Oval Glossy Red
Classic red looks bold yet balanced on short oval nails. The rounded shape softens the intensity of red polish.
Step-by-Step

- Shape nails into oval.
- Apply base coat.
- Apply two thin coats of red polish.
- Let dry thoroughly.
- Seal with glossy top coat.
Materials
• Red nail polish
• Base coat
• Glossy top coat
Beginner Tip
Choose true red for timeless style.
17. Short Oval Soft Peach Nails
Soft peach adds warmth while staying subtle. It’s perfect for spring and summer aesthetics.

Step-by-Step
- File nails into oval.
- Apply base coat.
- Apply two thin coats of peach polish.
- Let dry completely.
- Finish with glossy top coat.
Materials
• Peach nail polish
• Base coat
• Top coat
Beginner Tip
Peach looks flattering on warm skin tones.
18. Short Oval Minimal Black Dot

Instead of decorating every nail, add a single tiny black dot near the base of one accent nail for contrast.
Step-by-Step
- Apply nude or white base polish.
- Let dry fully.
- Use dotting tool to place one tiny black dot near cuticle on ring finger.
- Seal with glossy top coat.
Materials
• Nude or white polish
• Black polish
• Dotting tool
• Top coat
Beginner Tip
Keep accent minimal for clean aesthetic.
19. Short Oval Shimmer Top Coat
Add subtle shimmer over neutral polish for soft sparkle without full glitter coverage.

Step-by-Step
- Apply nude or pink base polish.
- Let dry.
- Apply fine shimmer top coat evenly.
- Seal if needed.
Materials
• Nude polish
• Fine shimmer polish
• Top coat
Beginner Tip
Choose fine shimmer rather than chunky glitter.
20. Short Oval Beige with Micro French Tip
This modern take combines beige base with ultra-thin white tip.
Step-by-Step
- Apply beige base polish.
- Let dry completely.
- Draw ultra-thin white tip line.
- Keep line subtle and clean.
- Seal with glossy top coat.
Materials
• Beige polish
• White polish
• Thin brush
• Top coat

Beginner Tip
Rotate finger to follow natural oval curve.